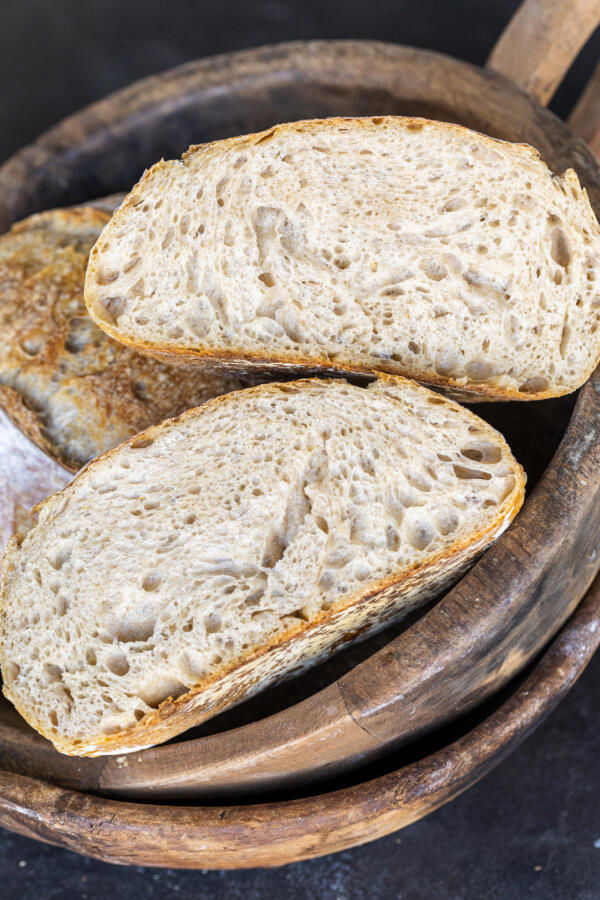
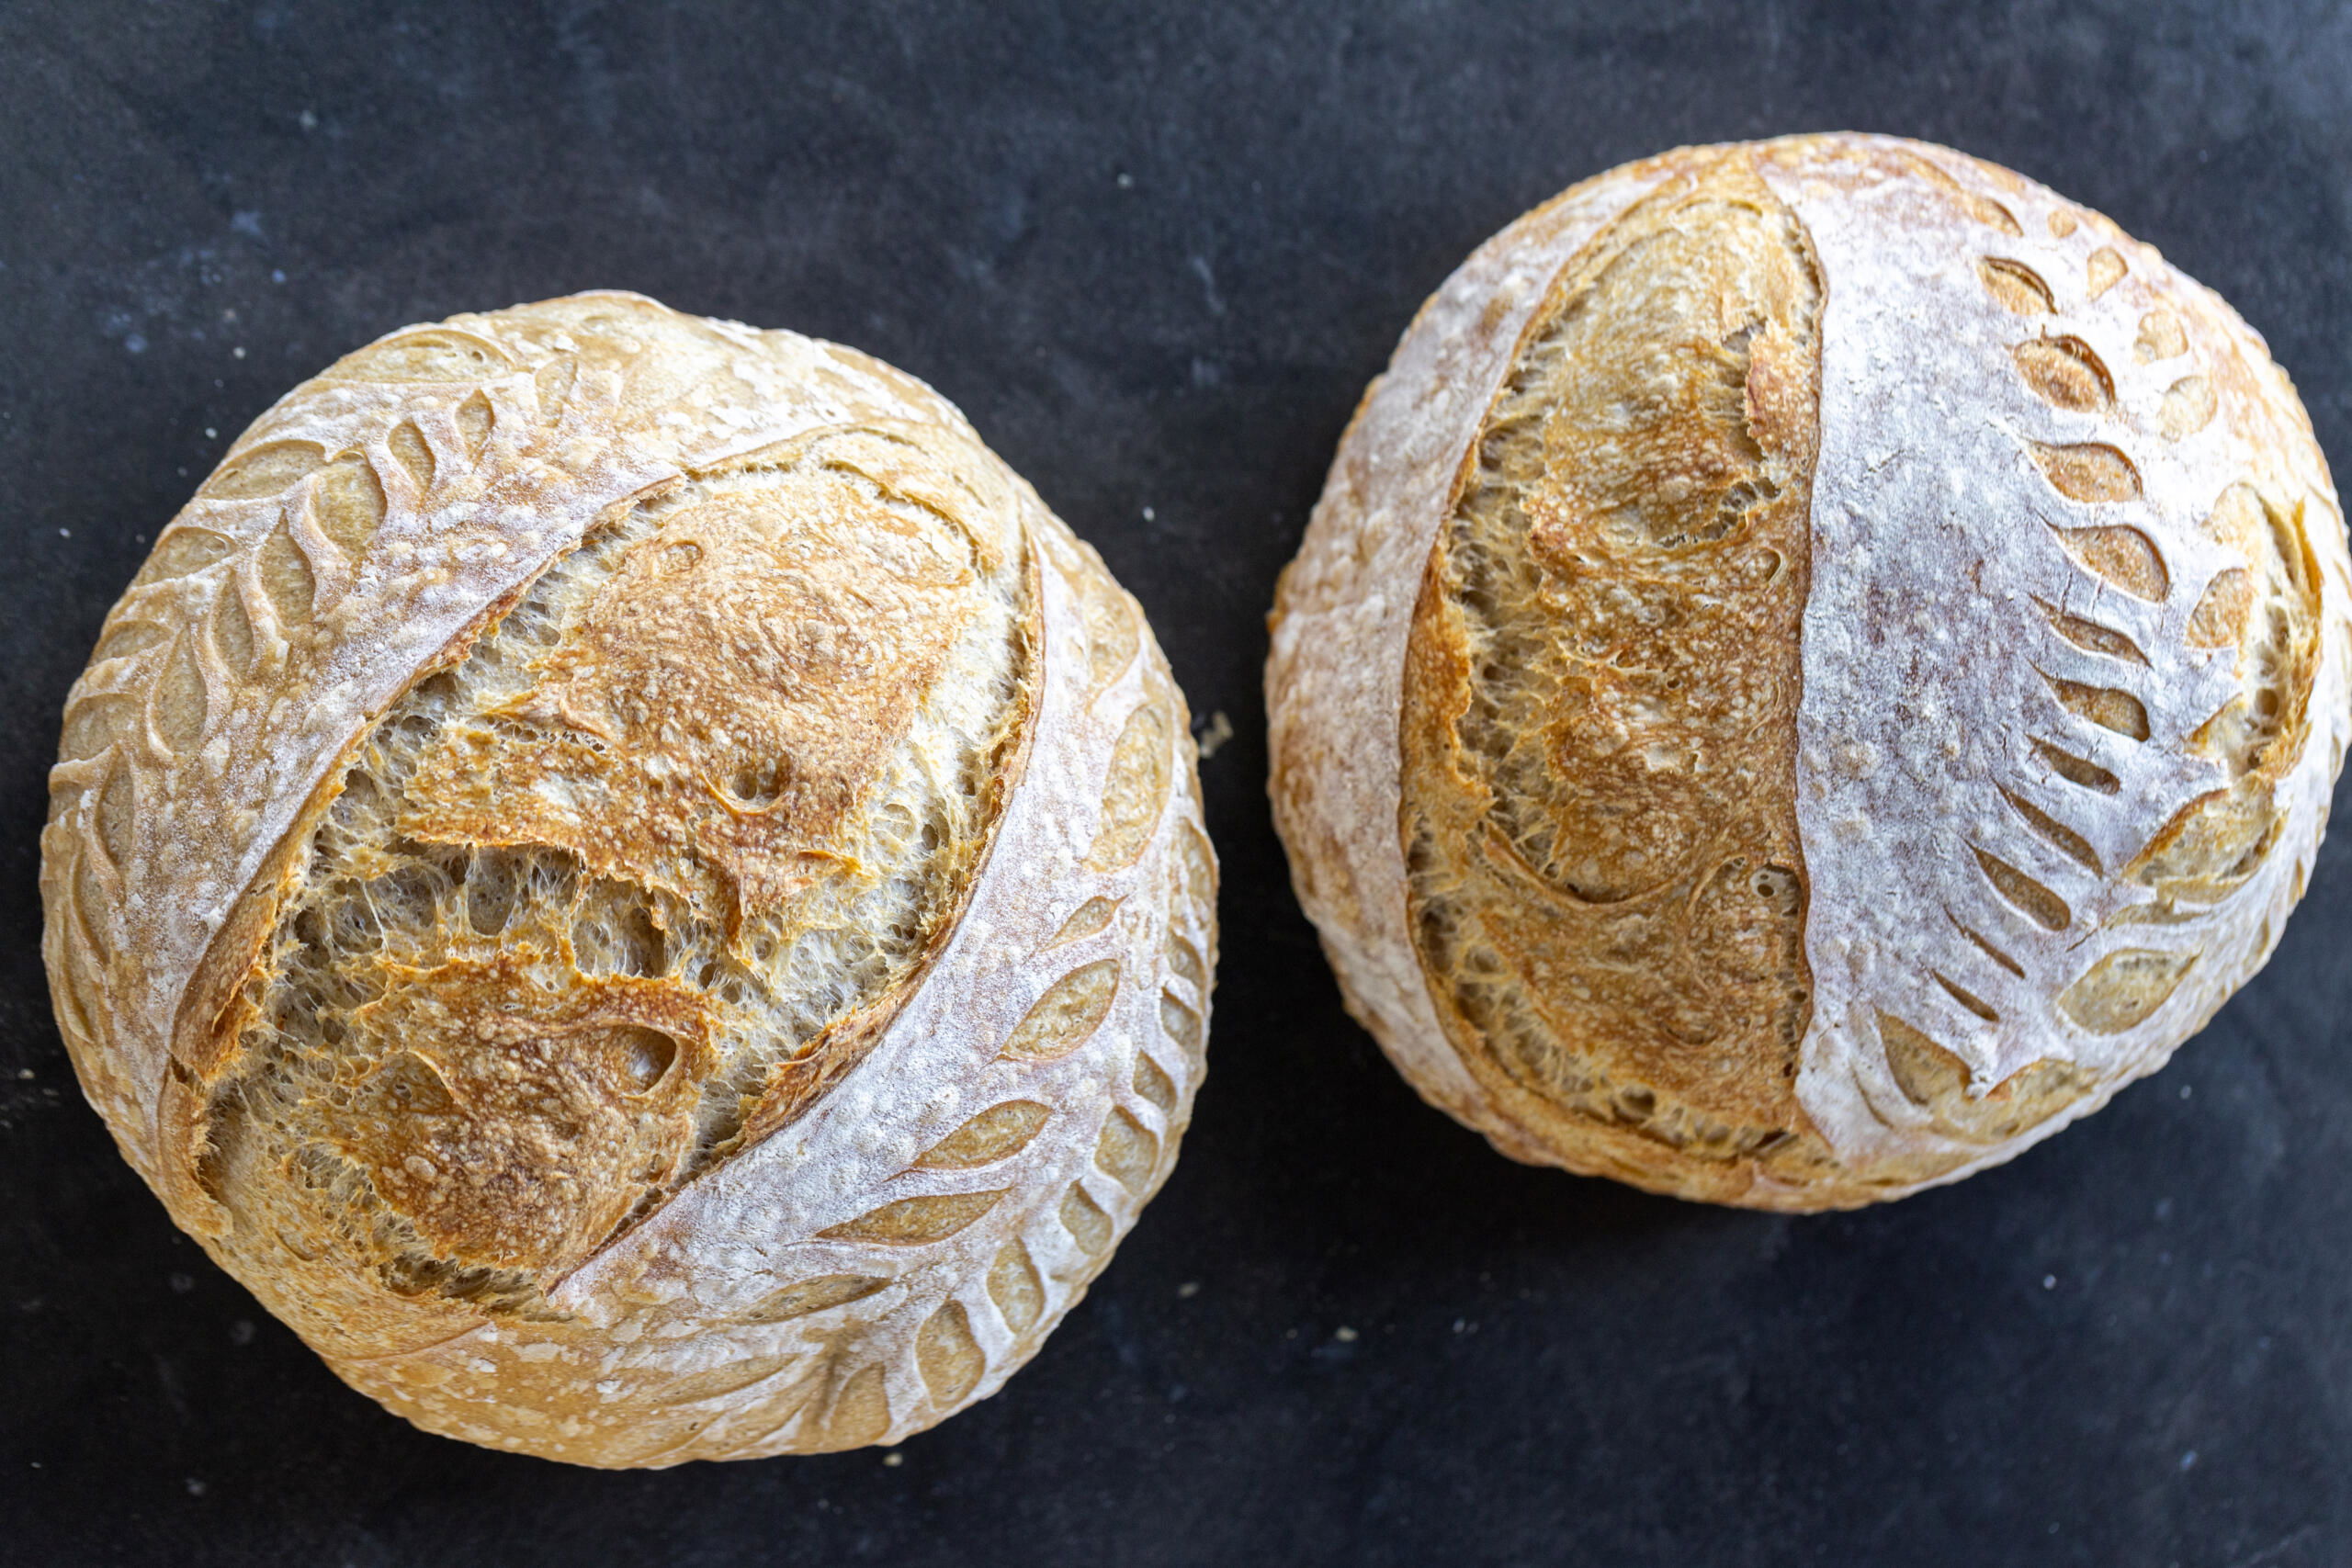
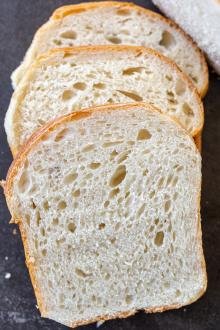
Imagine an airy, fluffy loaf of bread with a crackly golden crust… mmm. This high hydration sourdough bread recipe is foolproof, easy to follow, and irresistible.
I have been so excited to share this recipe with you guys! After many months (over a year, actually) of experimenting, I’ve perfected my high hydration sourdough game. Creating this recipe was a unique process because a bunch of volunteers in our Momsdish community were involved in testing it and giving me their feedback. I wanted to make this recipe perfect for you guys, and I’m proud to say that we finally made it! Regardless of your experience with sourdough or baking skills, you are guaranteed to make an incredible loaf of bread with this guide.
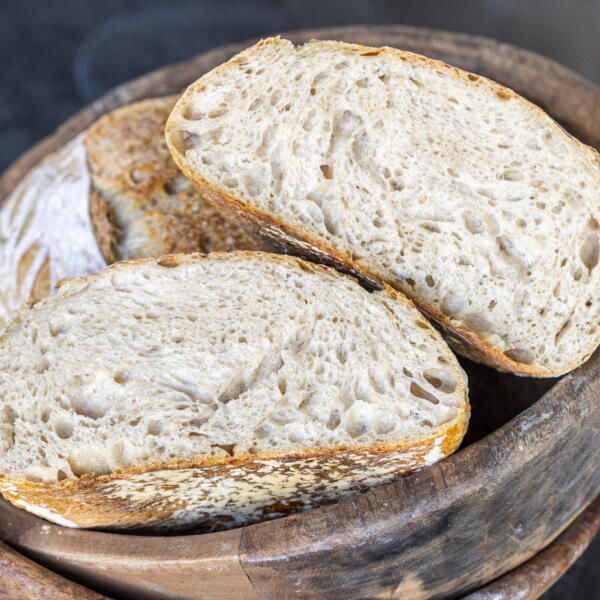
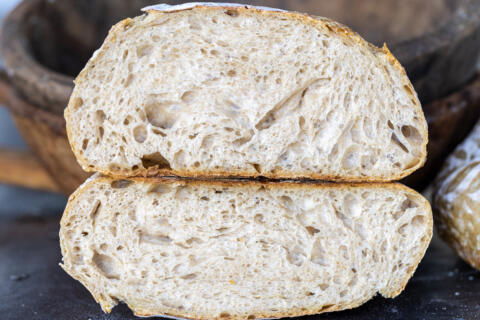
This dough is 80% hydrated, which means that it has 80% water relative to the amount of flour. Why is this important? A highly hydrated dough such as this one produces a more open crumb, softer texture, and thinner crust. It’s deeply flavorful and not too sour as long as your starter is freshly fed, making it perfect for the people in your life who aren’t huge fans of the “sour” sourdough flavor.
I’ve specially adapted this recipe to produce two loaves because I love giving away bread to my friends. If you prefer to bake on a smaller scale however, feel free to cut the recipe in half. Before you get started, I highly recommend checking out my favorite sourdough tools on my Amazon storefront to make sure you’re prepared. It’s got proofing baskets, bread lames, Dutch ovens, and more!
Reader review: “I had to come back and report to you that the bread stayed so fresh for a few days! I froze one loaf, and defrosting it was so easy. Plus, it was so so soft as if I had just baked it! And today, my kids who don’t like a very sour taste told me that this bread is the best one yet! So the verdict- I will be switching my bread recipe to this one! Thank you again for sharing it with me!”
Hot tip: Usually, I feed my starter in the evening, make the dough the next morning, shape it in the late afternoon and refrigerate it overnight, and bake the bread fresh in the morning. I use this convenient 3-day timeline whenever I make this bread!
How To Make High Hydration Sourdough Bread
Making sourdough can be intimidating because of words like “autolyse” and “bulk ferment,” but I promise that it’s easier than you think. Follow these steps and use the pictures as visual cues, and you’ll be golden!
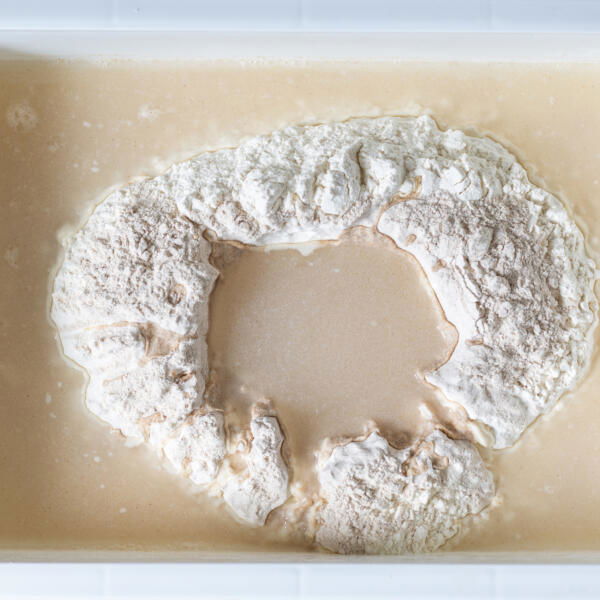
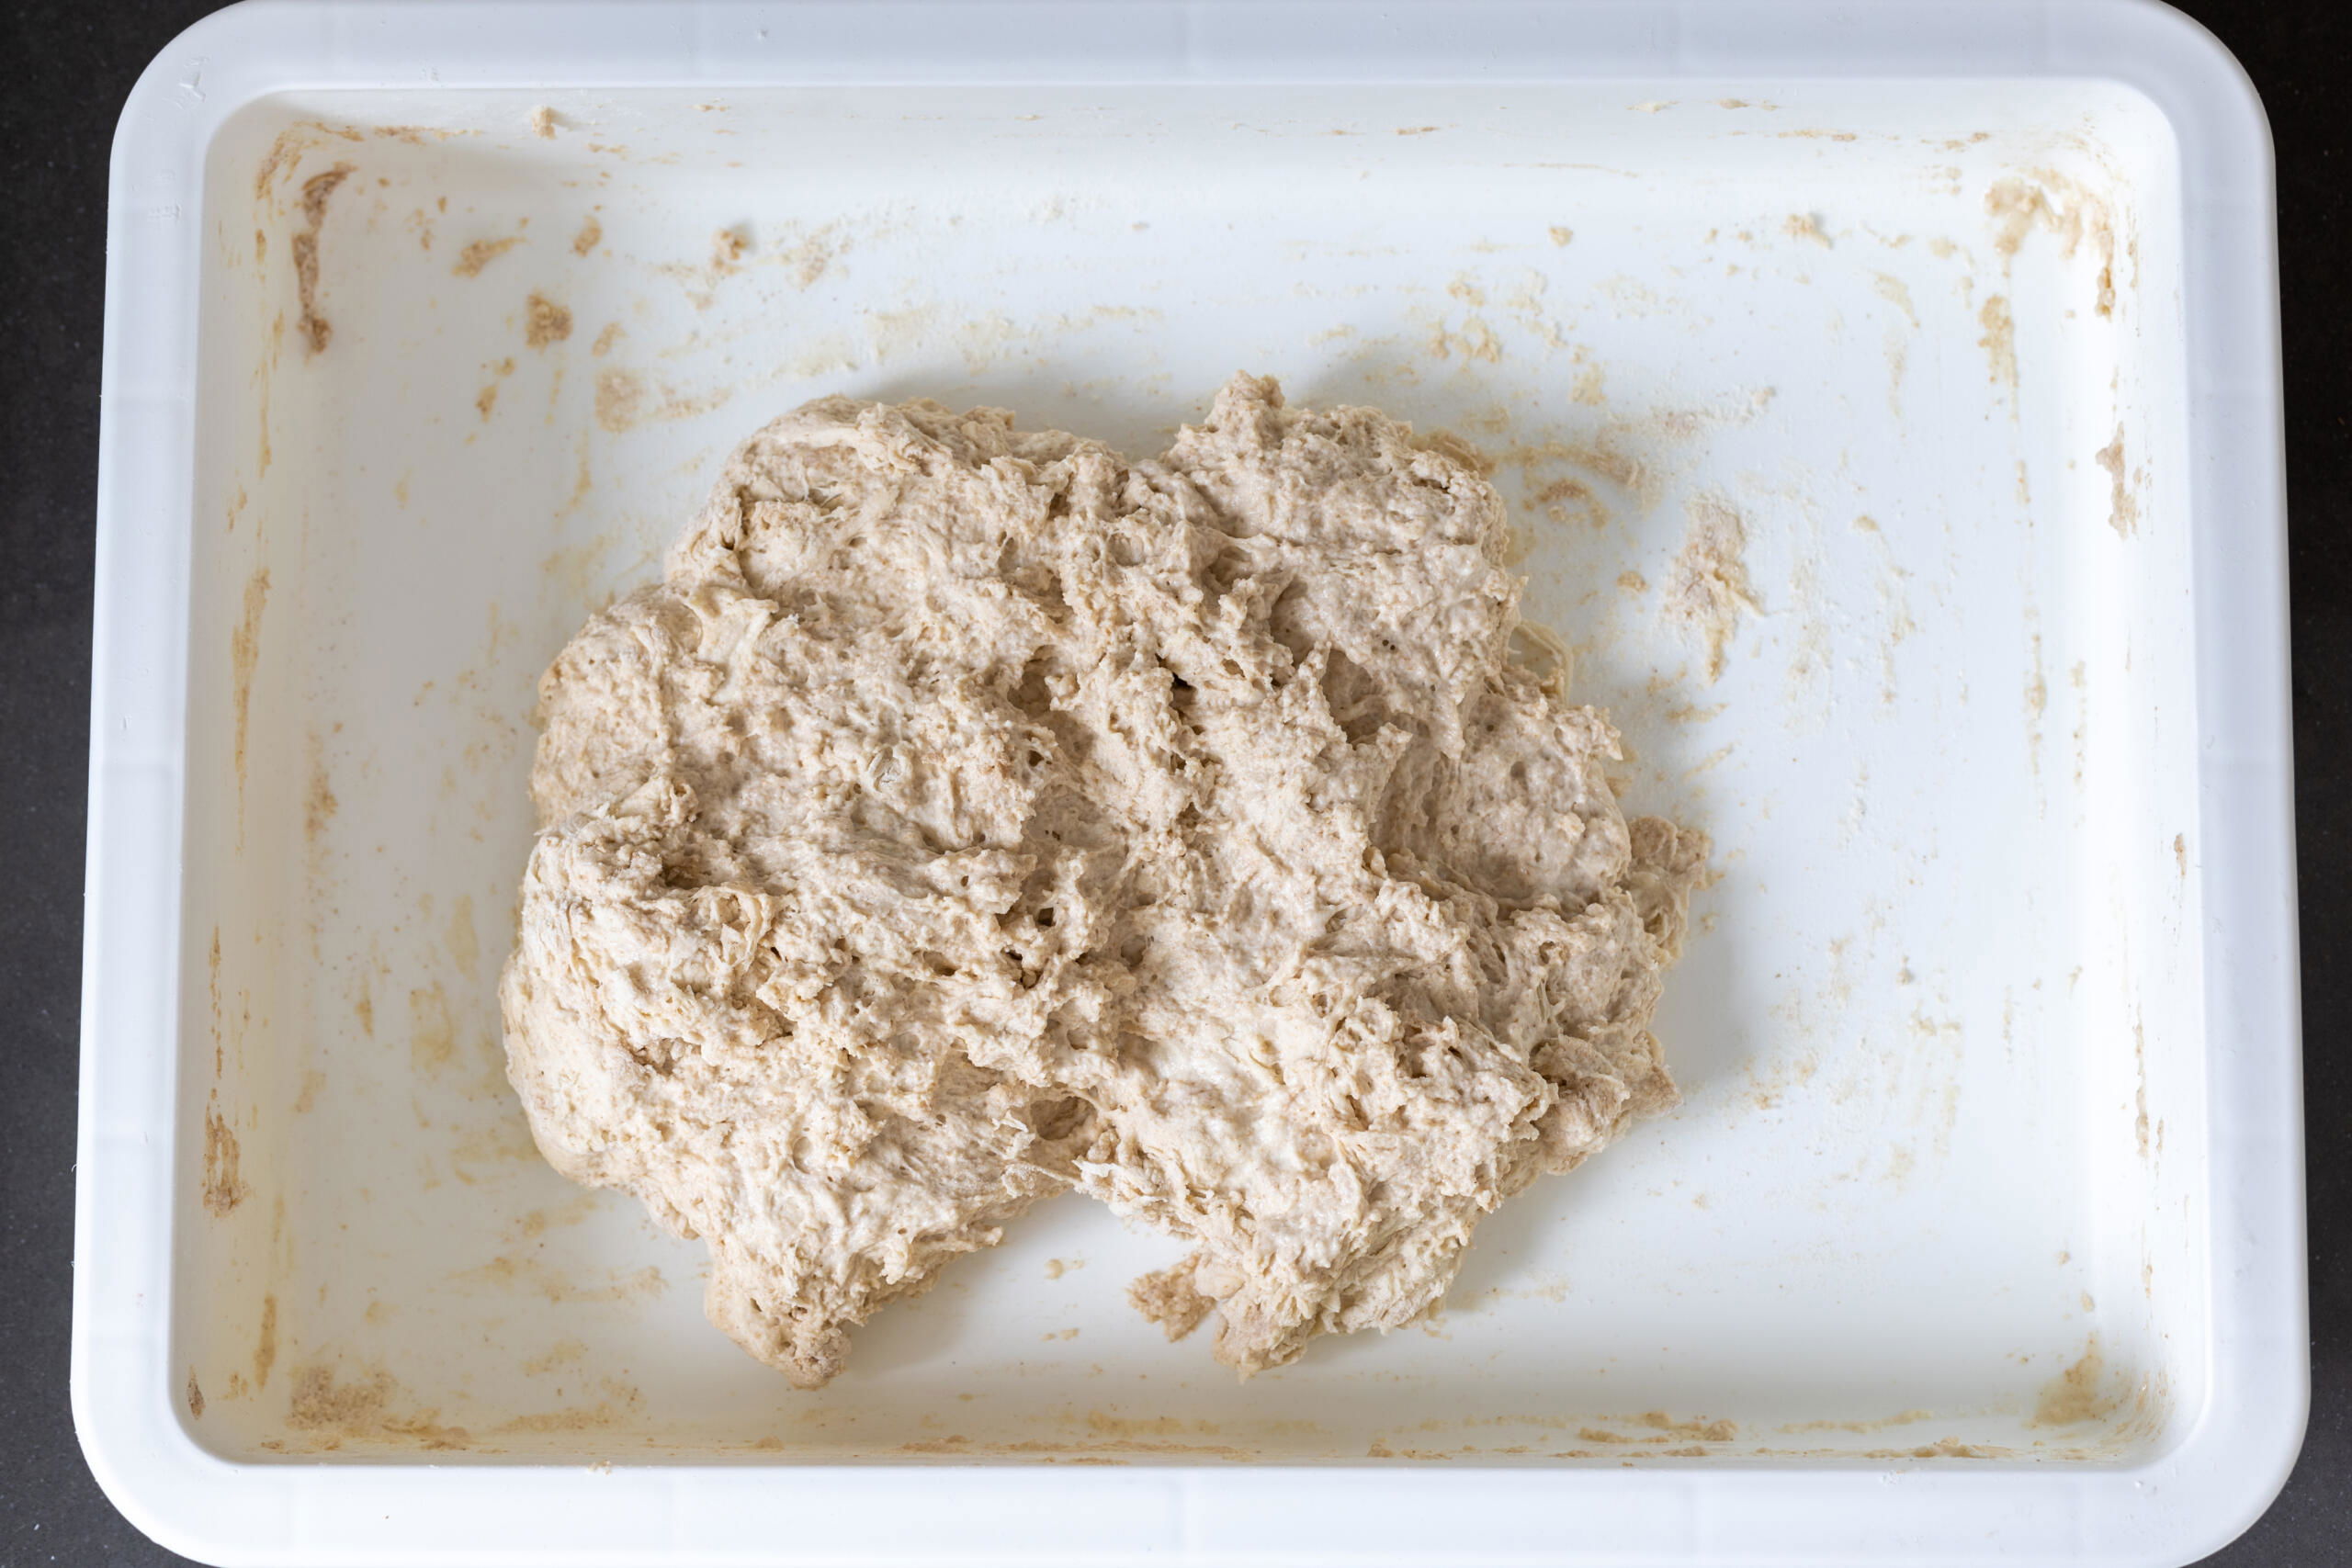
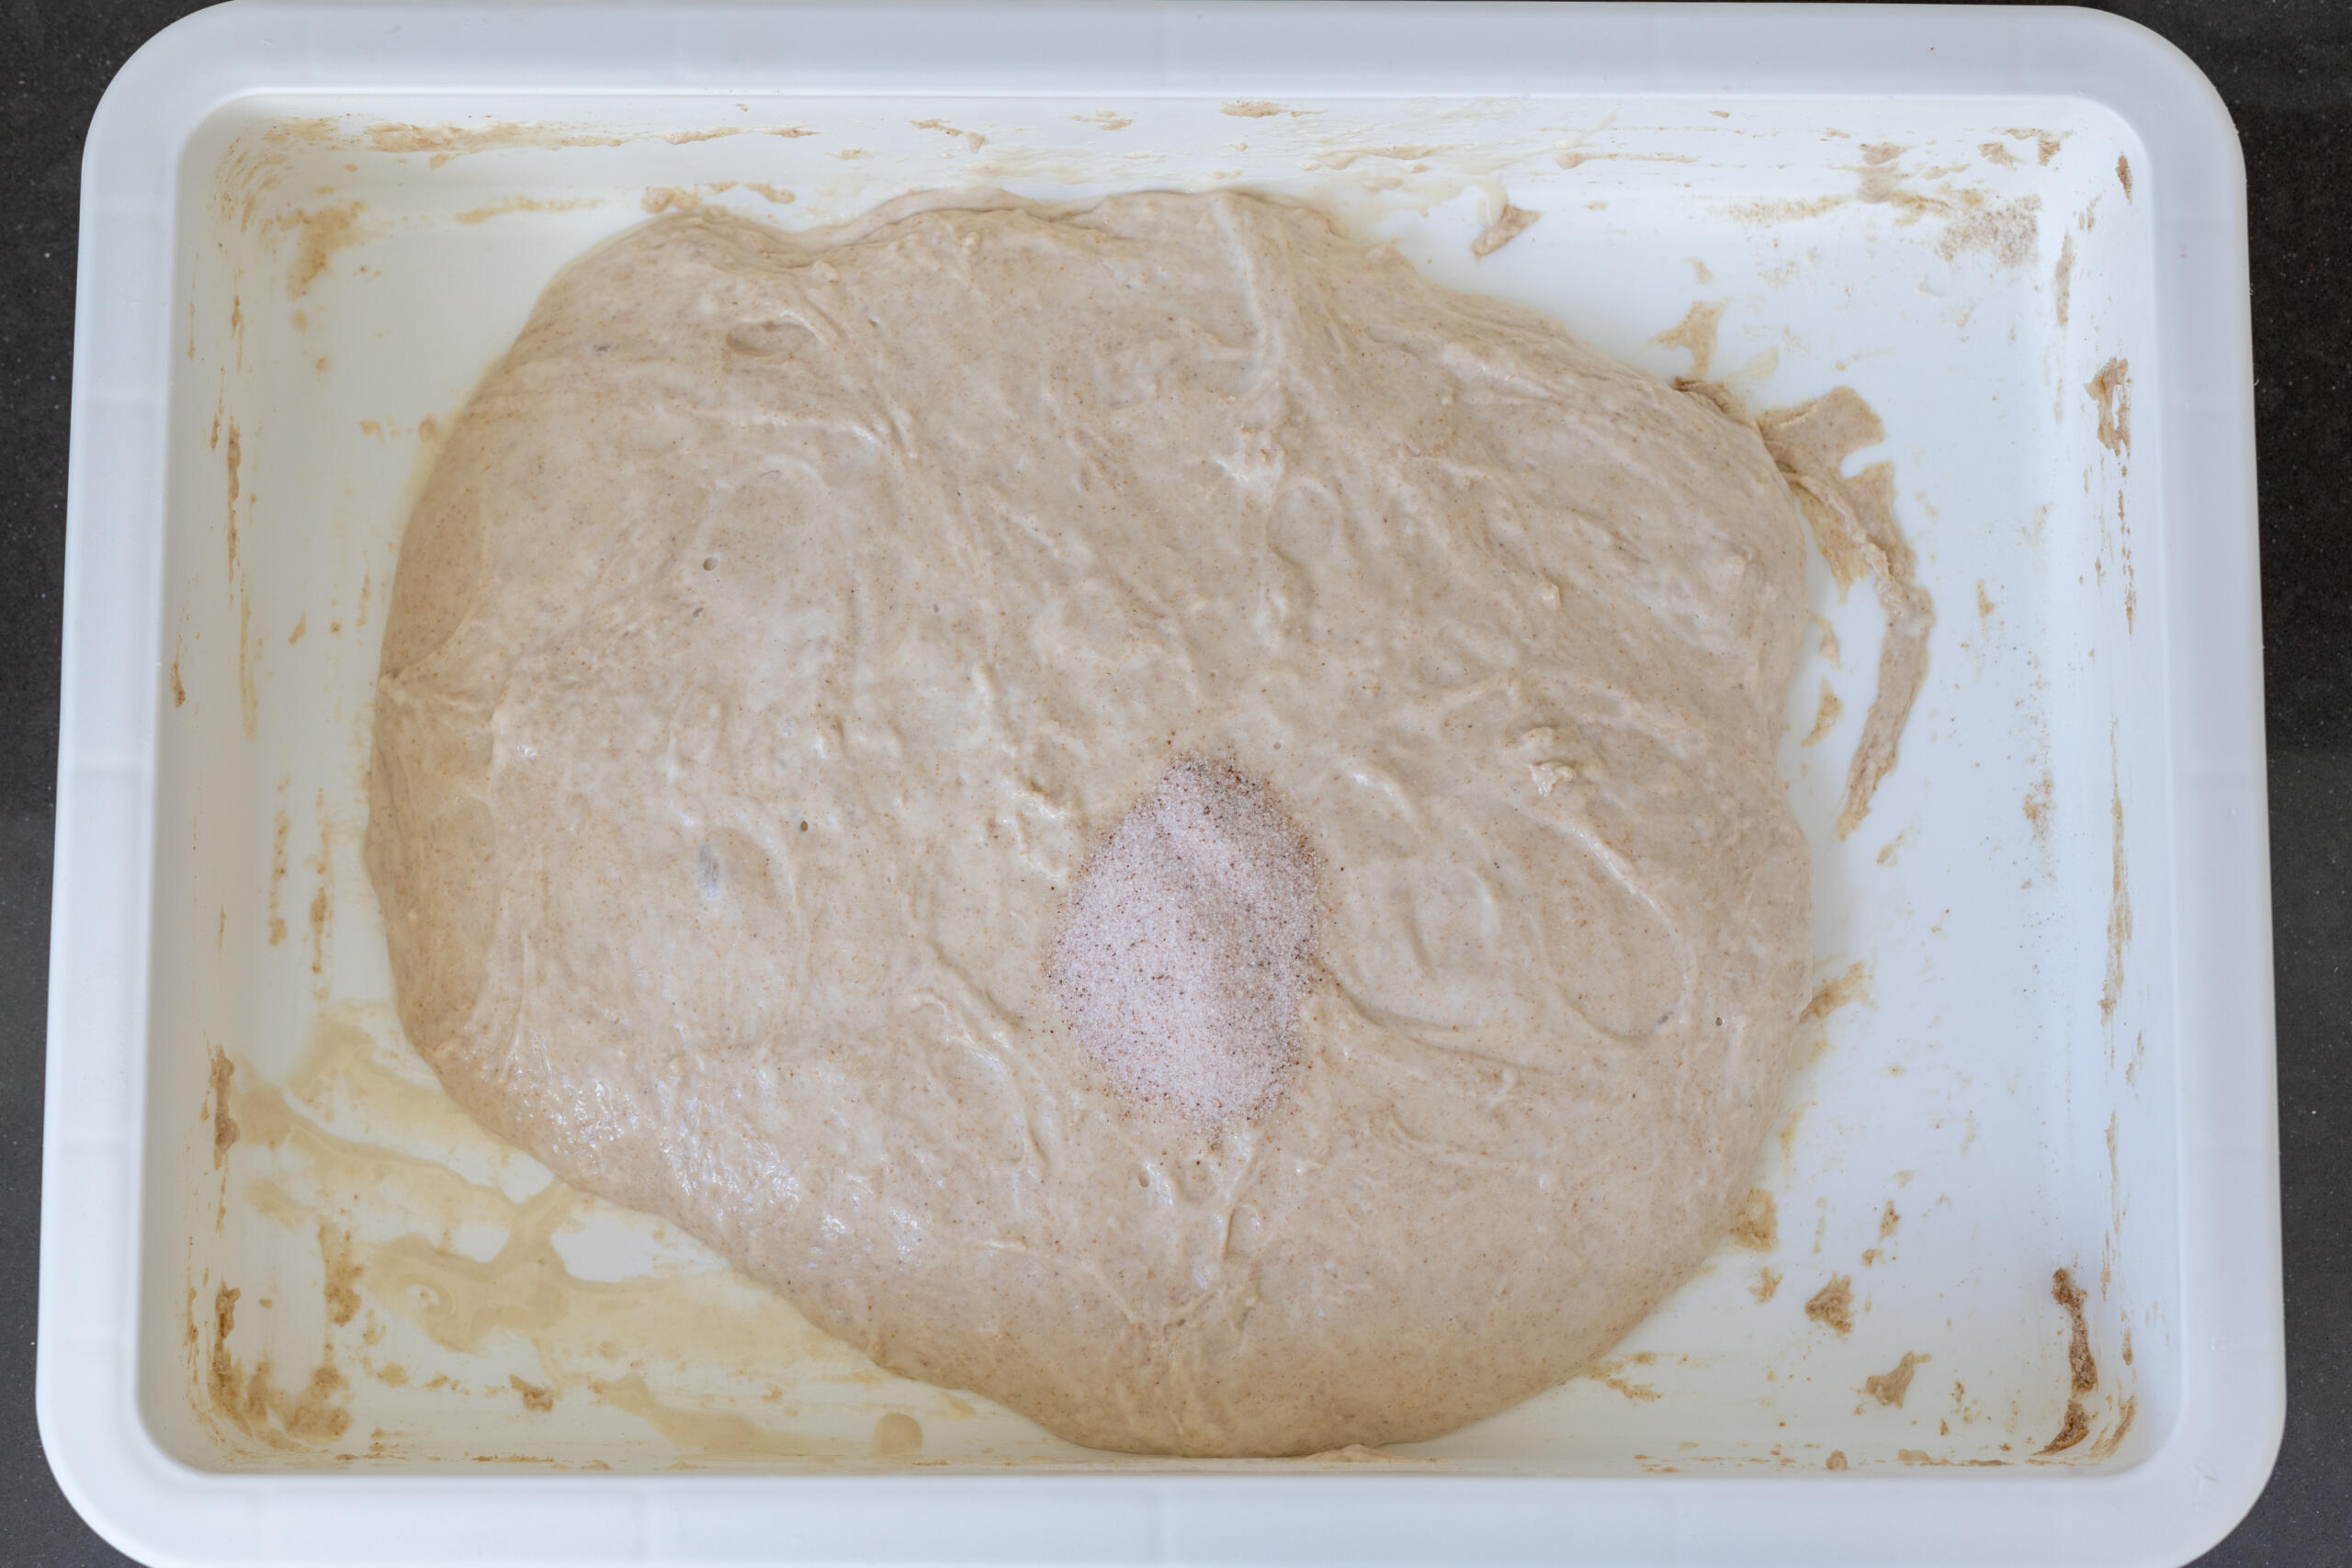
- Autolyse the flour and water: In a large bowl, mix together the bread flour, whole wheat flour, and water. Cover the bowl and allow the dough to rest for 60 minutes.
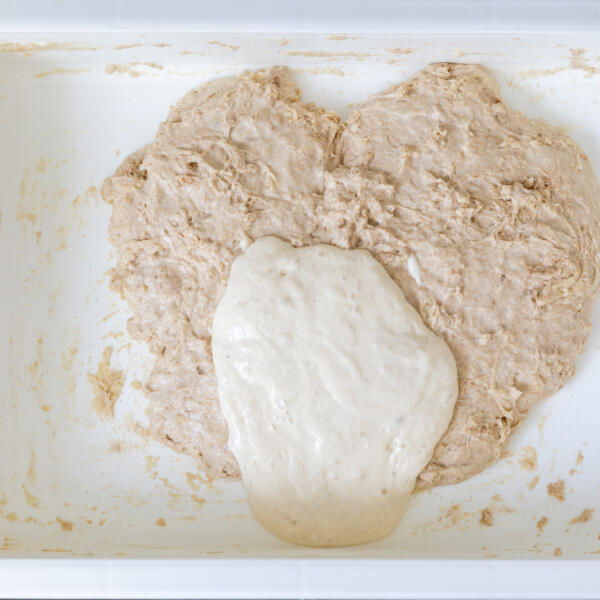
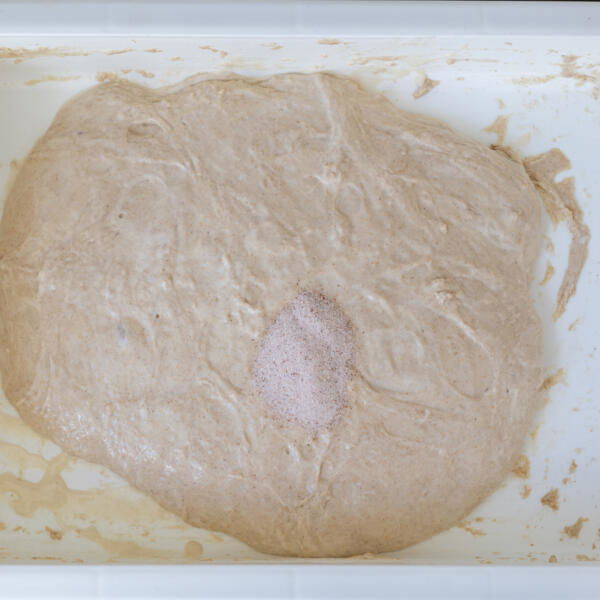
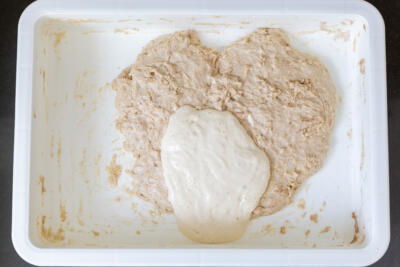
- Add the starter and salt: Add the starter and leave the dough to rest for 30 minutes, then mix in the salt and give it another 30 minutes.
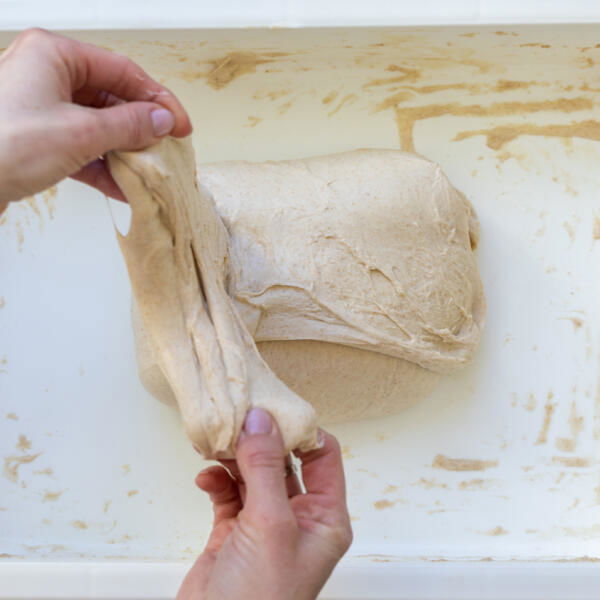
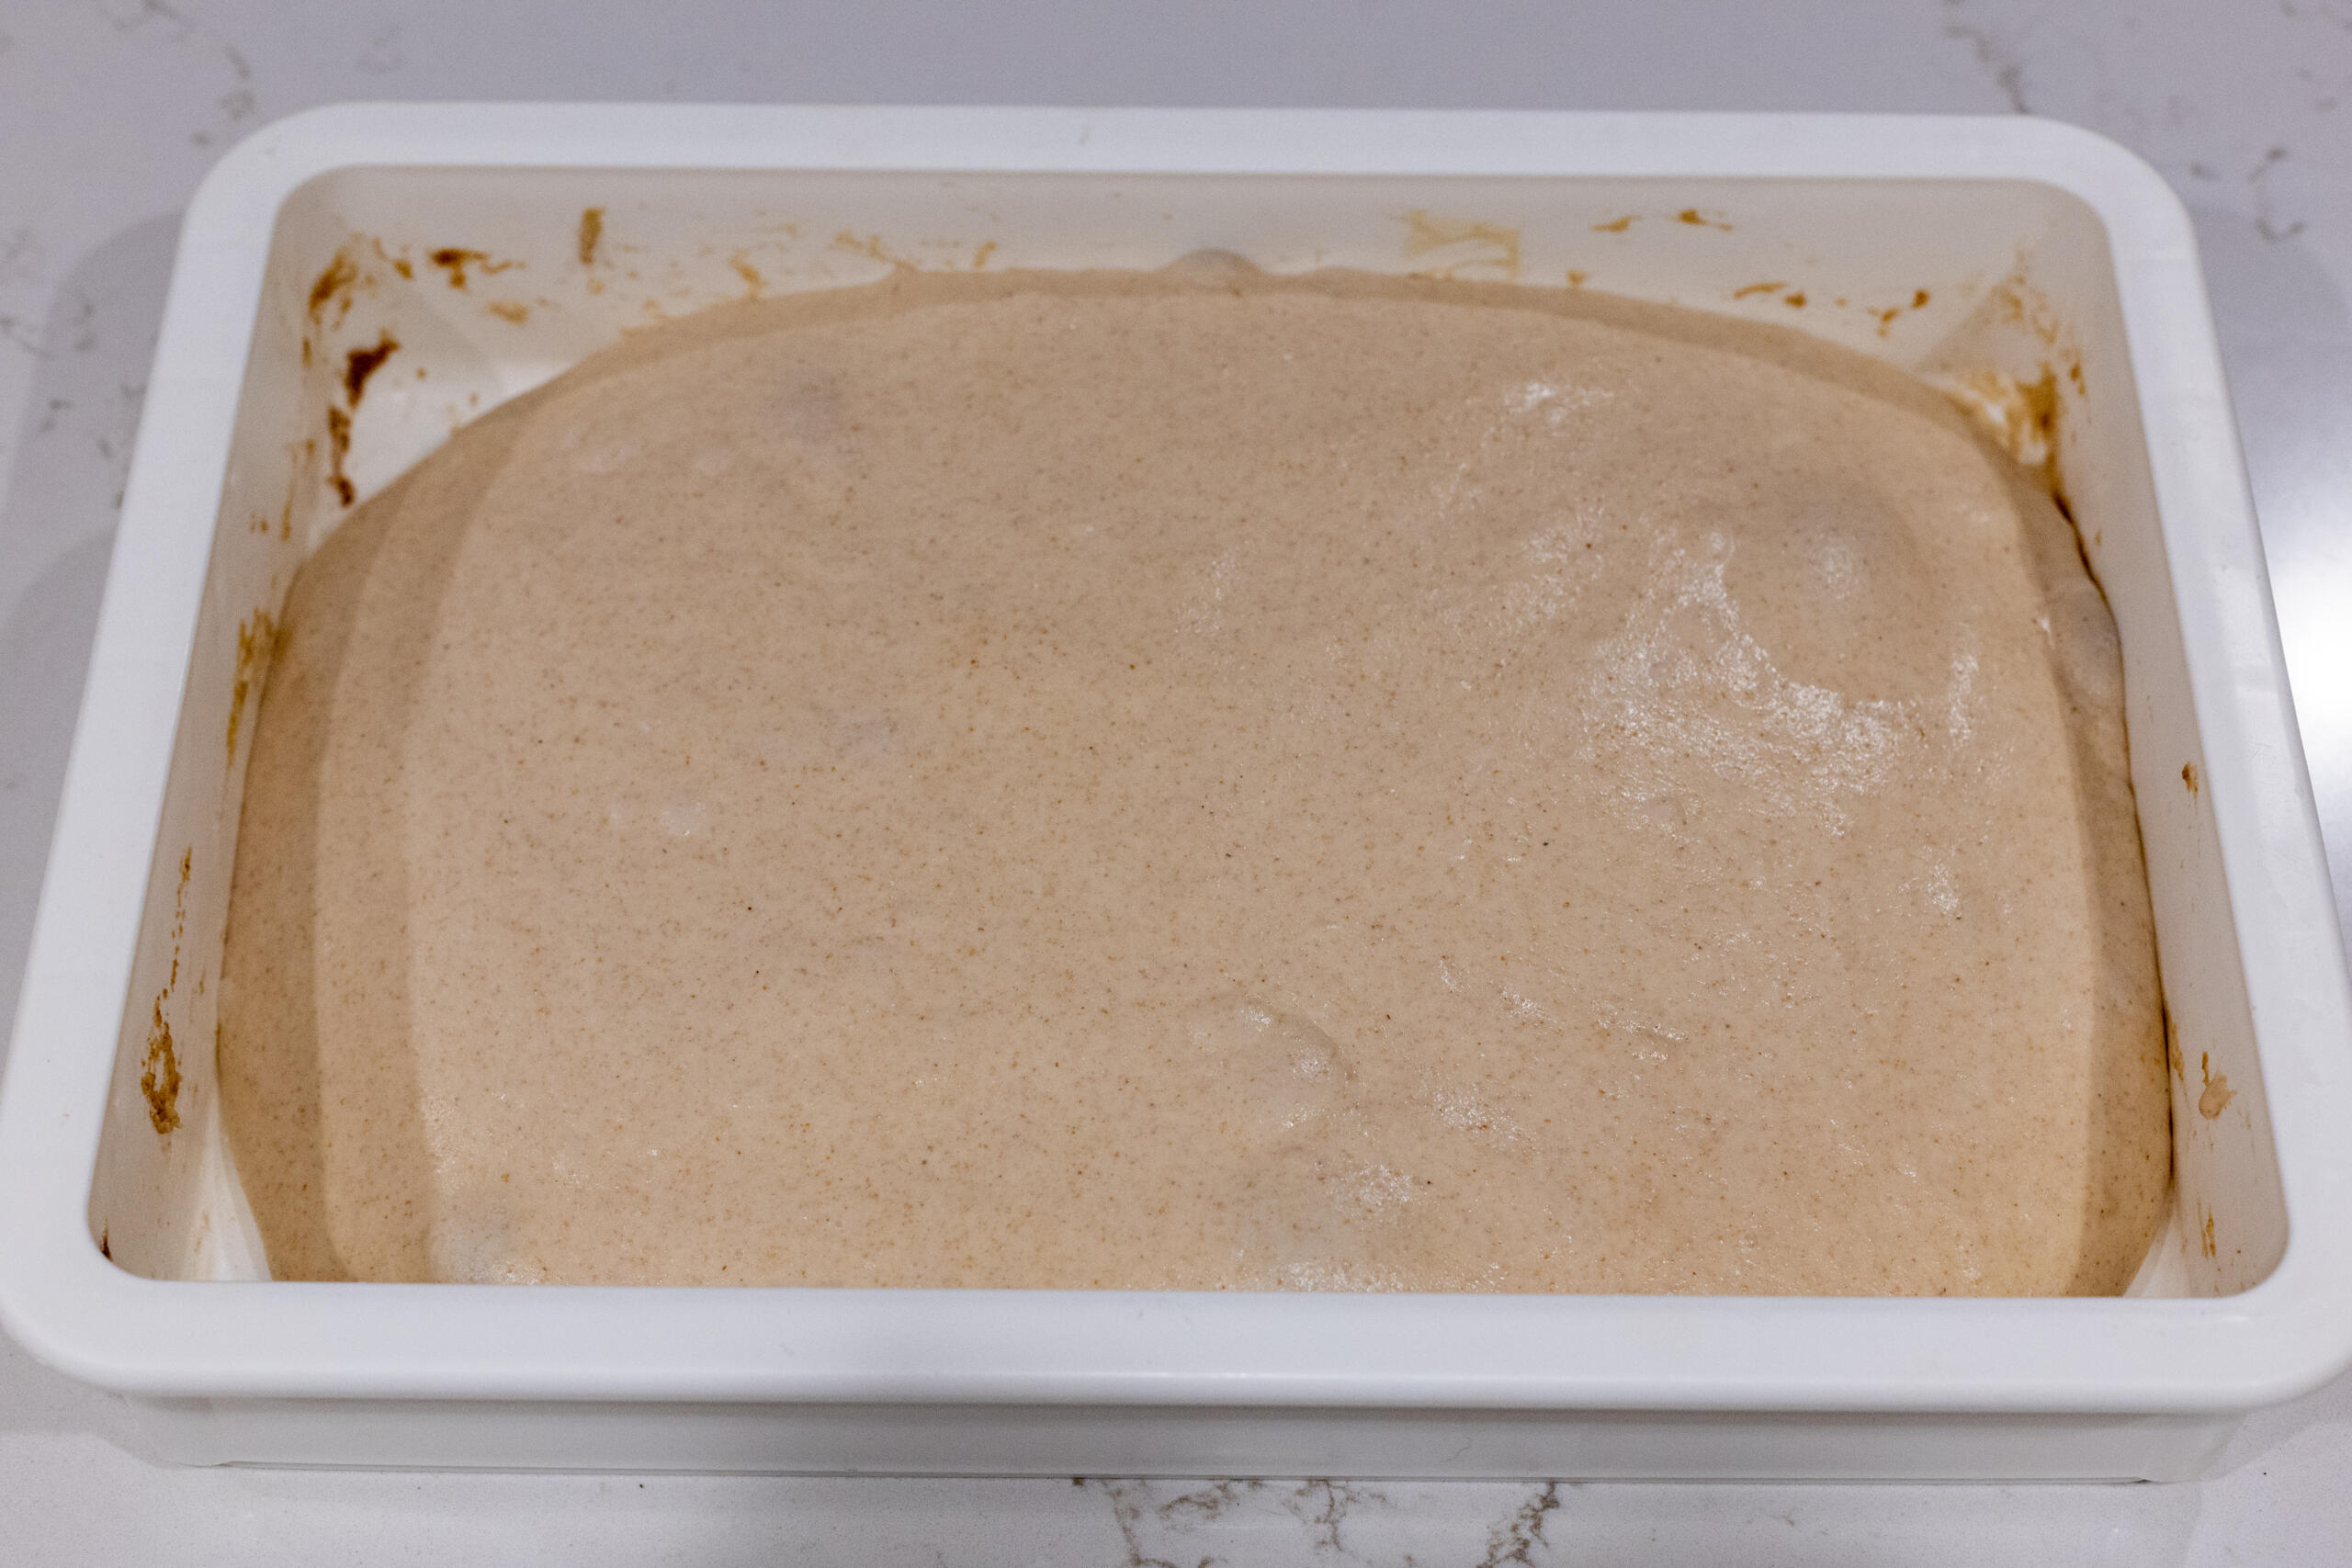
- Stretch and fold the dough: Perform one stretch and fold every 45 minutes for a total of four times.
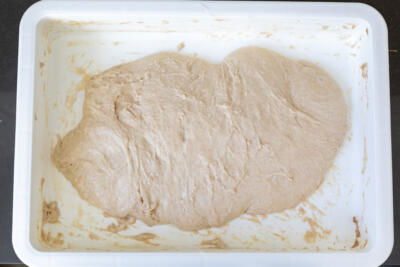
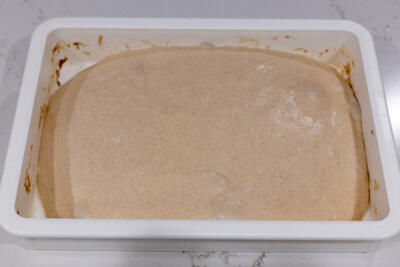
- Allow the dough to bulk ferment: After the final stretch and fold, allow the dough to rest for four fours, or until it doubles in size.
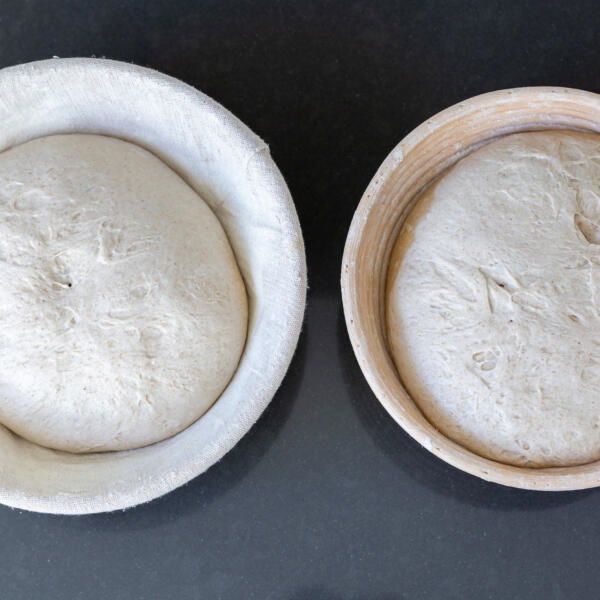
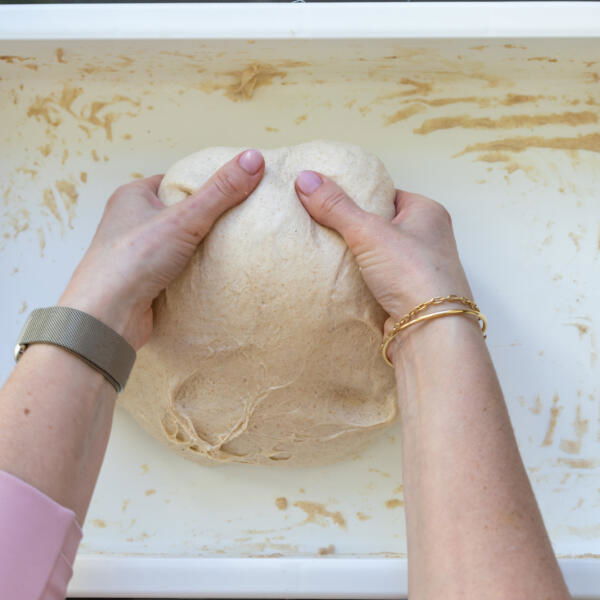
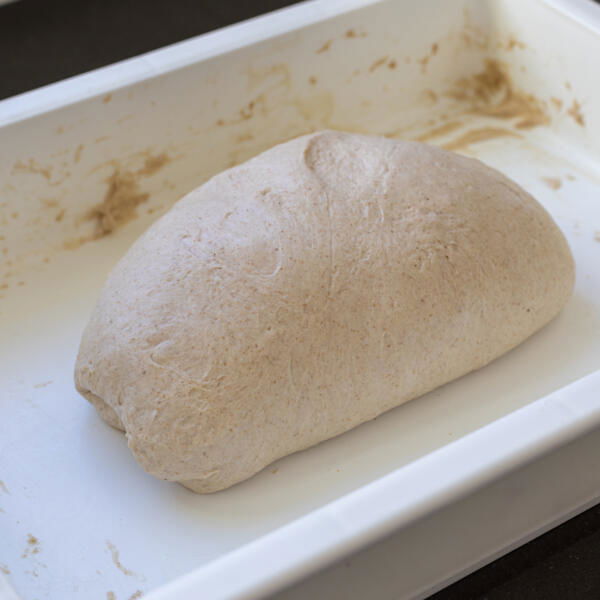
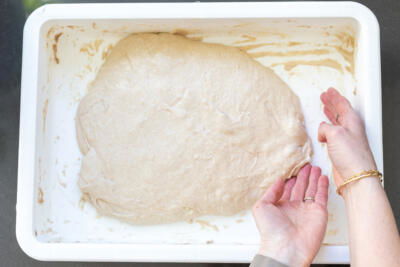
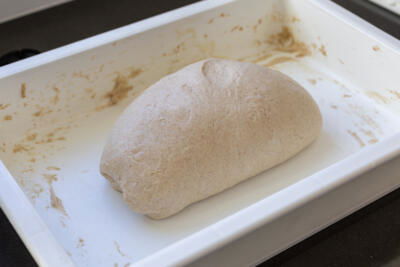
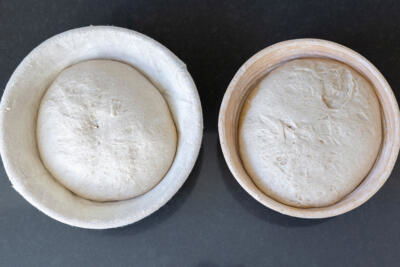
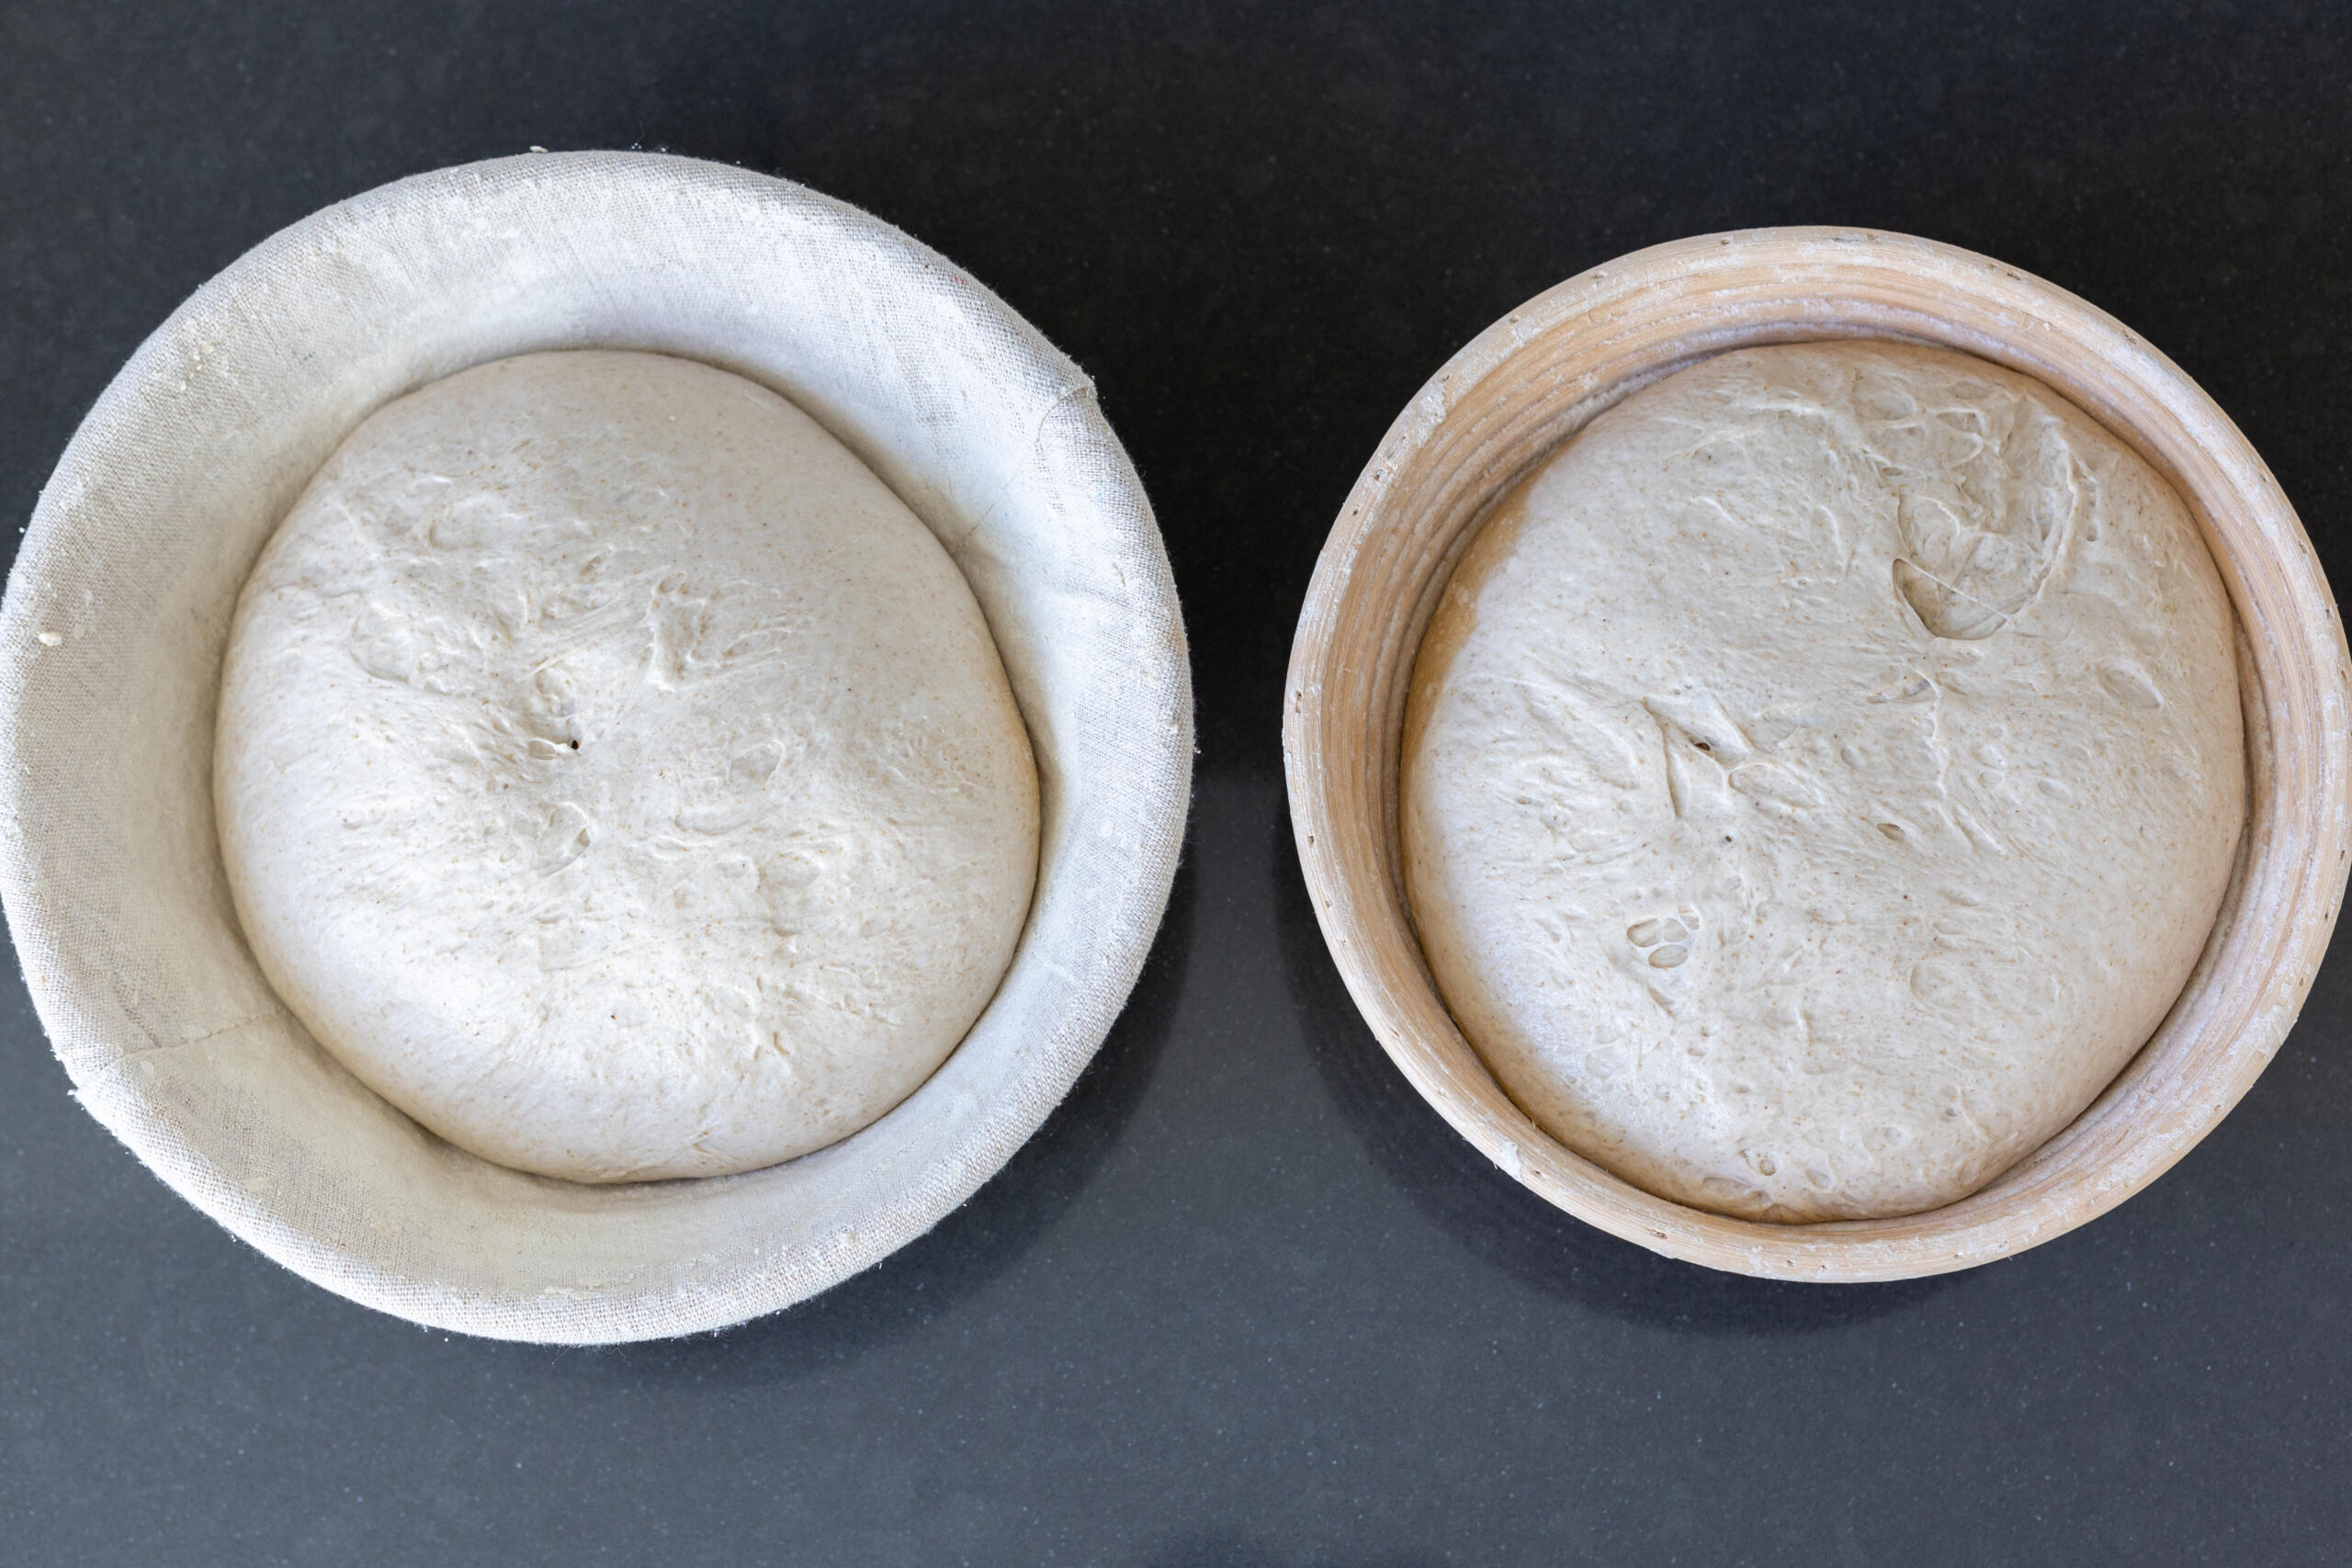
- Shape and chill the loaves: On a well-floured surface, divide the dough in half and shape it into two round loaves. Transfer each loaf seam-side up into a proofing basket, cover with plastic wrap, then refrigerate the dough for 12-24 hours.
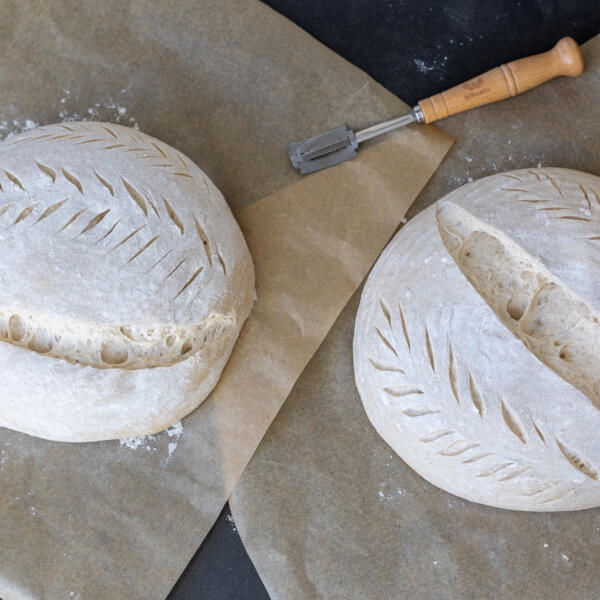
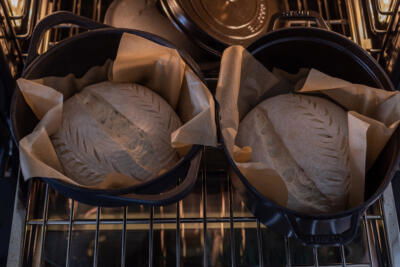
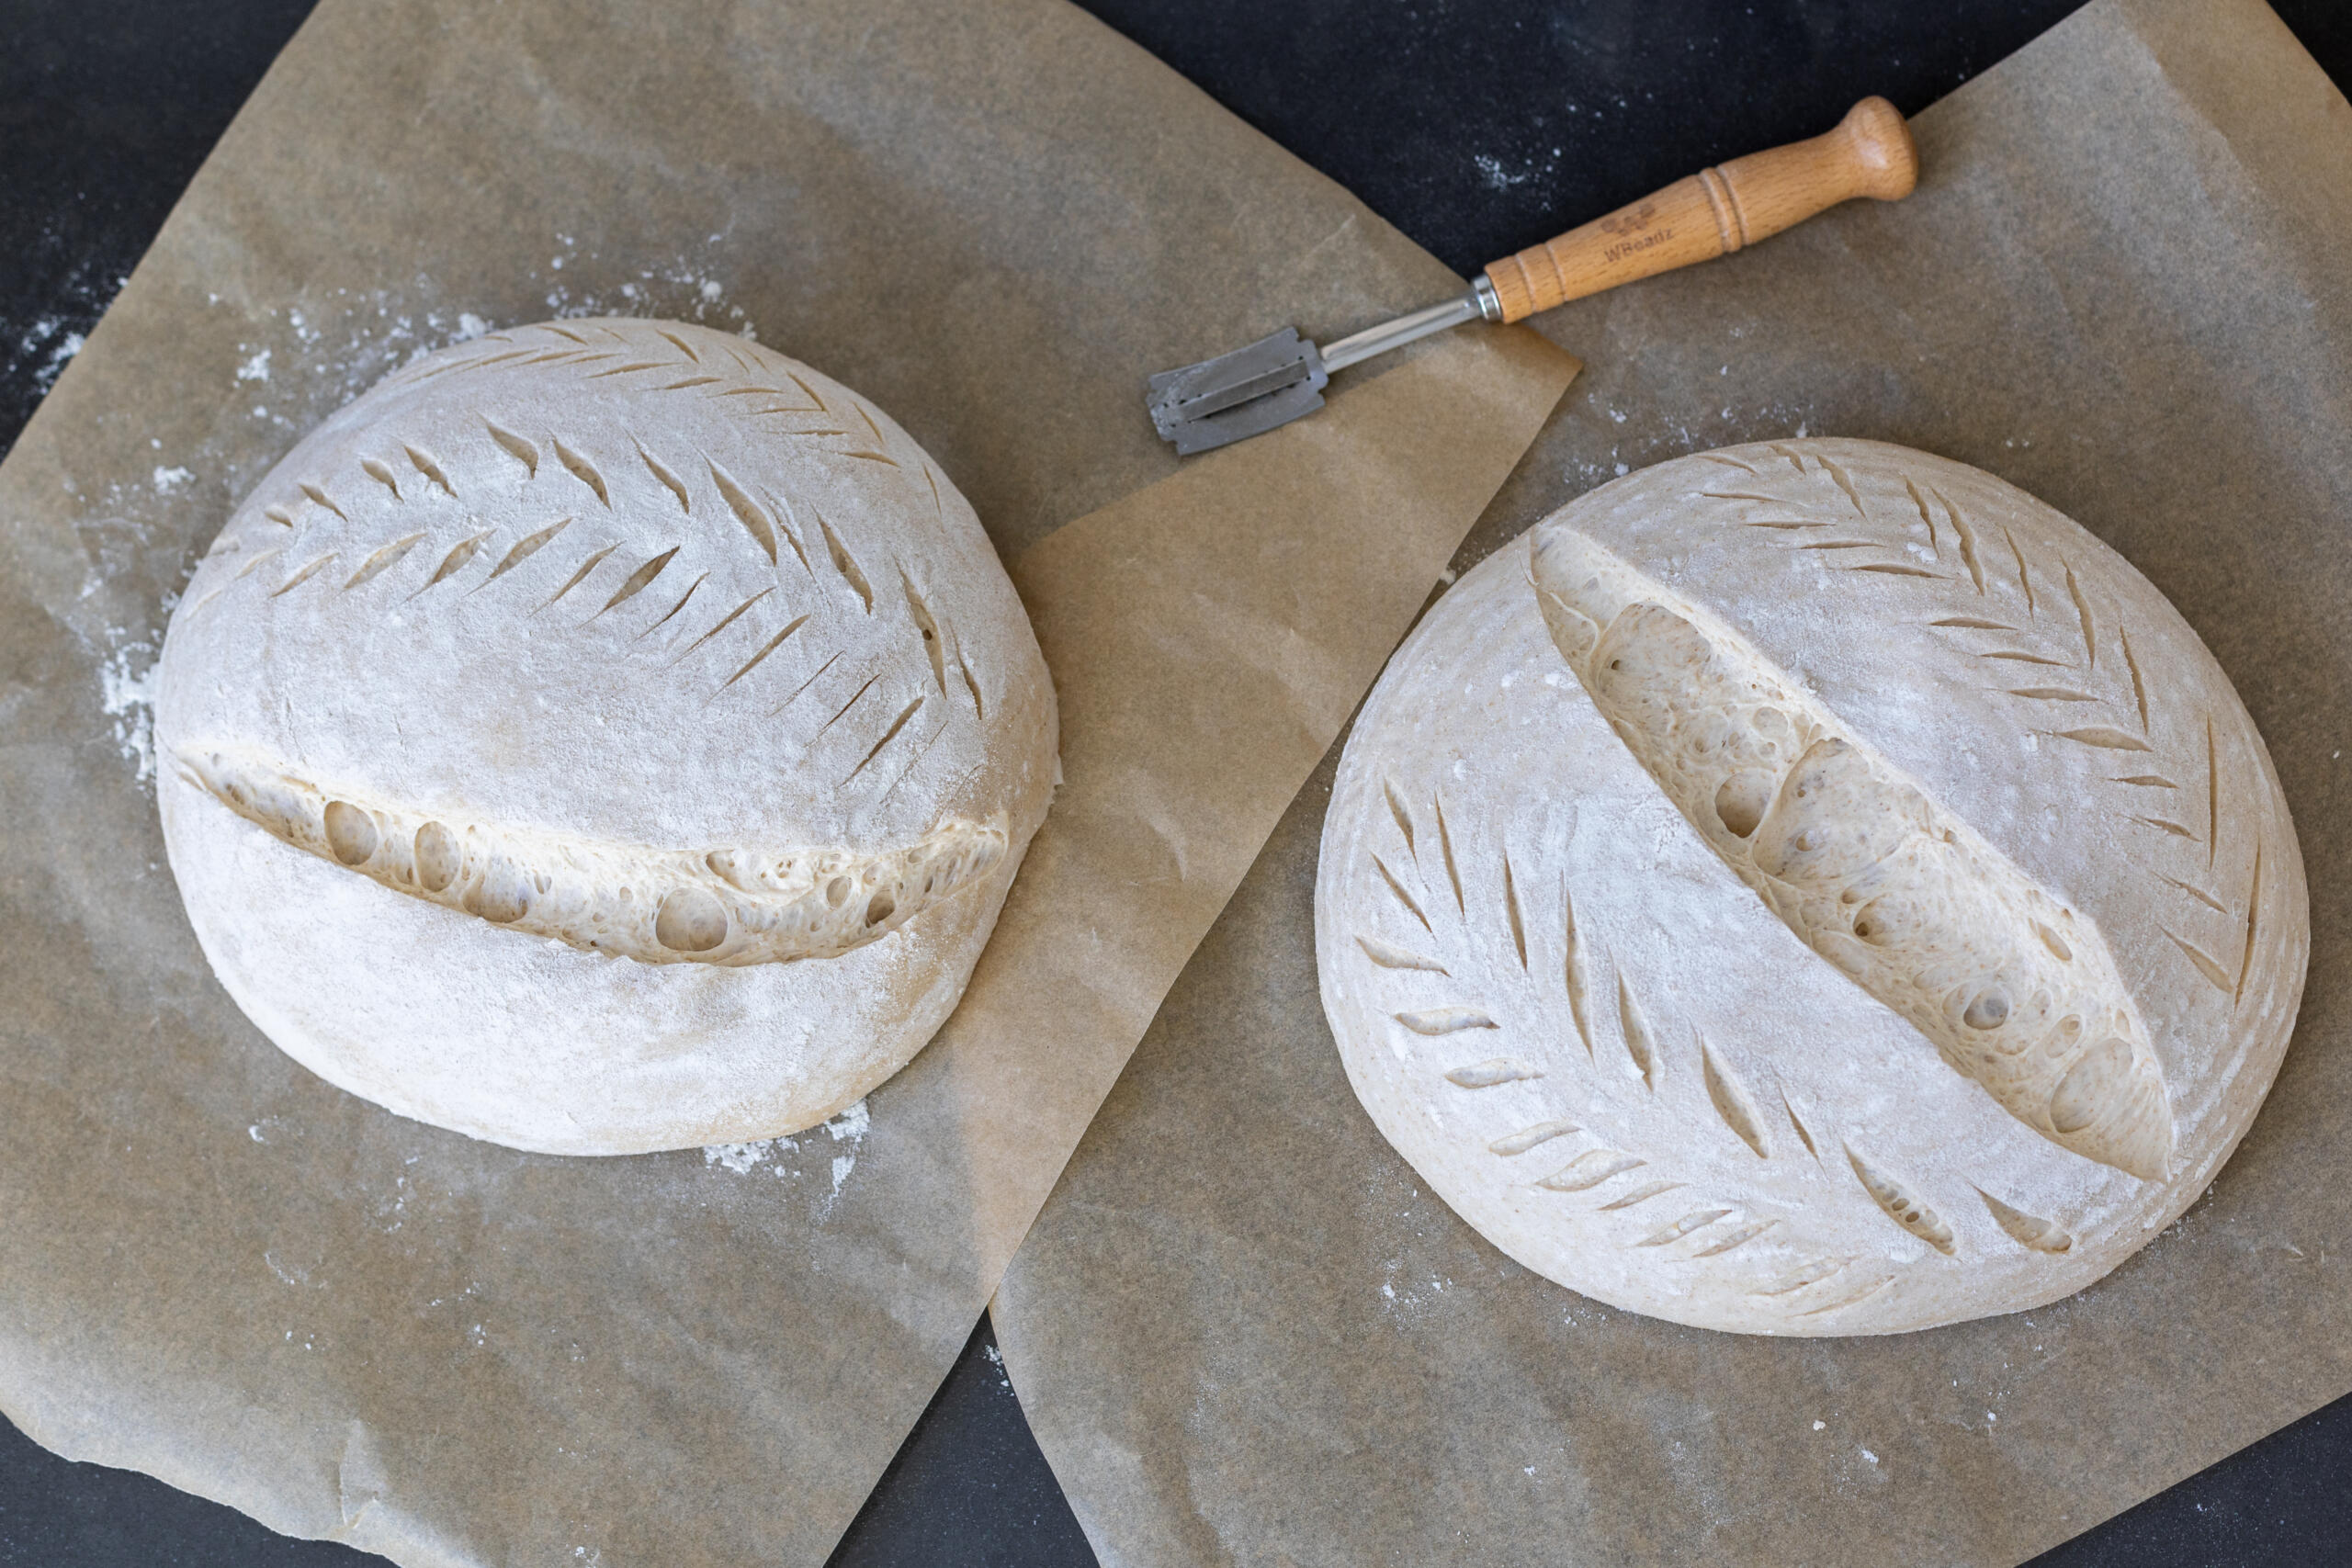
- Preheat the oven and score the loaves: The next day, preheat the oven to 450°F with two Dutch ovens inside. Remove the loaves from the fridge and score them.
- Bake the bread: Immediately transfer the loaves to the preheated Dutch ovens, cover, and bake for 25 minutes. Remove the lids and bake the loaves for another 20 minutes, or until they are golden brown.
Hot tip: If you prefer to use a scale for accurate measurements when baking sourdough, weigh out 720 grams of bread flour, 180 grams of whole wheat flour, 720 grams of water, 180 grams of sourdough starter, and 18 grams of salt.
Tips for Perfect Sourdough Bread
Alright you guys, take a seat and get comfortable… we’re going to sourdough school. I’ve been making sourdough for years, and these are my top tips for gorgeous, tasty loaves. Don’t skip this!
- Set reminders! Life is busy for us moms, so an Apple watch or phone is super helpful when it comes to staying on top of the recipe steps. This is truly such an easy recipe, but it does require some attention, so set a timer for each step!
- Use active starter. For the best results, use a super bubbly and freshly fed starter. I feed mine with a 1:1:1 ratio of equal parts of starter, flour, and water. If you don’t have your own starter, order it online and follow this feeding guide.
- Autolyze the dough. It sounds technical and fancy, but autolyzing the dough simply means allowing the flour to absorb the water for 30-60 minutes before adding the starter and salt. This results in better gluten development, which leads to easier shaping of the loaves and taller rising.
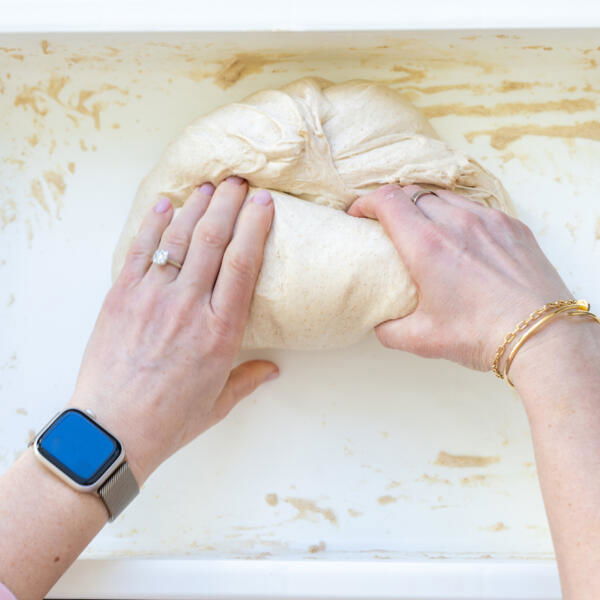
- Use wet hands to stretch and fold the dough. This is quite a sticky dough, so wet your hands for each set of stretch and folds to minimize sticking. Wondering what the heck a “stretch and fold” is? It’s easy! Grab a portion of the dough from the outside and stretch it towards the middle. Repeat until you’ve made it in a full circle around the bowl.
- Be patient! Making sourdough bread takes time, but it’s so worth it. Use visuals as a guideline more than the clock — allow the dough to rest after the fourth stretch and fold until it has doubled in size and is bubbly. This is called the “bulk fermentation,” and it may take anywhere from 4-8 hours depending on the room temperature.
- Shape the bread with a bench scraper. Say hello to your new best friend! A bench scraper helps to handle and shape sticky dough without adding extra flour. You’ve probably seen me use this handy tool in my YouTube videos.
- Fully preheat the Dutch oven. A 450°F Dutch oven mimics a commercial bread oven and encourages “oven spring,” or the rapid puff of the cold bread when it hits the hot surface. Allow the Dutch oven (lid included!) to fully preheat before adding the bread.
- Score the bread properly. Not only does scoring look pretty, it helps the bread to rise more in the oven by allowing the steam to escape. Slice the dough with a lame or clean razor blade in one quick, fluid motion at a 45° angle. Avoid sawing or digging — be confident!
- Allow the bread to cool completely before cutting in. Ughh, I know. This is the hardest part. But waiting at least 10 minutes before taking a slice prevents gumminess, squished slices, and premature staleness (speaking from experience).
Storage
Fresh sourdough bread rarely lasts more than a day in our family, but on the rare occasion that it does, I LOVE how well this bread stores. If you need more convincing, read the review at the beginning of this post!
- Room temperature: To store for up to four days, place the fully cooled loaf in a ziplock bag at room temperature.
- Refrigerator: To store for up to a week, refrigerate the cooled bread in an airtight container or bag.
- Freezer: To store for up to three months, freeze the cooled bread in a ziplock bag. Allow it thaw at room temperature, then reheat it in the toaster or oven.
More Sourdough Bread Recipes
- Sourdough Bread — The most basic, beginner-friendly, foolproof recipe!
- (Almost) Whole Wheat Sourdough Bread — Hearty loaf made with a blend of white bread flour and whole wheat flour
- Sourdough Sandwich Bread — Fluffy, super soft, and perfect for lunch prep
- Sourdough Focaccia — Customize with any of your favorite toppings
- Overnight Sourdough Bagels — Mix the dough together the night before, and you’ll have bakery-worthy bagels the next morning!
Recipe
Ingredients
- 5 3/4 cups bread flour
- 1 1/2 cups whole wheat flour
- 3 cups water
- 3/4 cup sourdough starter
- 1 tbsp salt
Instructions
- In a large bowl, mix together the bread flour, whole wheat flour, and water. Cover the bowl with plastic wrap or a clean damp kitchen towel and allow the dough to rest for 60 minutes.

- Mix in the starter and leave the dough to rest for 30 minutes.
- Add the salt, mix, and leave the dough to rest for another 30 minutes.

- Perform the first stretch and fold, then leave the dough to rest for 45 minutes.
- Perform the second stretch and fold, then leave the dough to rest for 45 minutes.
- Perform your third stretch and fold, then leave the dough to rest for 45 minutes.
- Perform the fourth and final stretch and fold. Allow the dough to rest for four hours.
- On a well-floured work surface, divide the dough in half and shape each half into a round. Transfer each round seam-side up into a proofing basket, then refrigerate the dough for 12-24 hours.
- Preheat the oven to 450°F with two Dutch ovens inside. If your oven can only fit one, keep the other loaf refrigerated while you bake the first one. Remove the loaves from the fridge, flip onto parchment paper, and score each one.

- Immediately transfer the loaves to the preheated Dutch ovens, cover, and bake for 25 minutes.
- Remove the lids and bake the loaves for an additional 20 minutes, or until they are golden brown. Allow the loaves to cool for at least 10 minutes before cutting in. Enjoy!


Having just started making bread.. I am loving it. You may say that anyone can make sourdough but your article did not take into account that those of us who have never made sourdough have also never made starter.
Hi, Kim. This is true with any sourdough recipe, you will need to have a starter before beginning the recipe. I usually recommend buying a starter online or asking your friends. One of my favorite starters is actually from a friend!
Hi Natalya, I did get a starter online. I am so excited to try your recipe but after the 3rd feed my starter rose but did not double. I have it in a 80F water bath to see if it will give it a boost. My house is 68F, probably colder because the temp outside is single digit. I cannot wait to get this going. I'm too old to sound this excited... but I am.
Hi Kim! I'm excited for you, too. The water bath is a good idea, you can also put it into a slightly warmed oven (or just turn the light on in your oven!). Sometimes it make take a few feeds for the starter to get really strong and double well. Let me know how it goes! Good luck 🙂
This is my favorite sourdough bread recipe! I made it by recipe and also used all white flour another time and it was so fluffy and delicious and came out perfect!
That’s fantastic to hear—thank you for sharing! I’m so glad it’s become your favorite. Love that it turned out beautifully both with the original recipe and with all white flour—fluffy sourdough is such a win. Happy baking!
This bread is very good! I added 1 tbsp of honey to the recipe and only did 2 sets of stretch and folds.
I made my bread dough at night (after 10 p.m.) , let the dough sit overnight on the counter. Then shaped the dough/bread, let it sit while the oven preheated, and baked it.
The bread turned out wonderful! Love it!
This is my new favorite sourdough bread recipe!😊
So glad to hear you loved it! 😊 Sounds like your overnight method worked like a charm. Thanks so much for sharing your tweaks, and I hope you enjoy the bread many more times!
Soooo delicious! And so easy to follow!
So glad you found it easy and delicious - that's the best combo!
For this recipe, can I feed starter and let it rise and put in fridge at its max- and just use it
The next day straight from
The fridge? Or not recommended?
Great question! I prefer a fresh starter for best results. Using one from the fridge might take a bit longer to become active in your dough.
I’ve already made this recipe twice, and every time it turned out amazing, Very soft and lots of bubbles, and stays fresh longer than usual sourdough. I’ve already saved it to my favorite recipe folder! I think it’s important to use good quality whole wheat flour, organic if possible, then it turns out very delicious!
That’s awesome to hear! I’m so glad you love the recipe and that it’s become a favorite for you. 😊 I agree -quality ingredients really do make a difference!
Excited! 😍 What brands of flour do you use?
Hi Aly, I usually use Bobs Redmill but sometimes I use King Arthur brand.
The list of ingredients says wheat flour, But the description (instructions) says whole wheat flour? So which one should I use?😊
Thanks for bringing this to my attention Oksana. I updated the recipe so it's more clear. I use whole wheat flour and linked the Bob's Red Mill brand I use. I hope this helps and happy baking!
This is literally the best sourdough recipe from the sourdough queen!! I always have to make at least 2 because an entire loaf is gone within minutes of coming out of the oven.
Thank you Julia, you are sooo kind!
Looks amazing! I’m going to try this with kamut flour and fresh milled whole wheat.
I can't wait to hear about how this goes! Keep us posted and happy baking 😀
Just baked an all kamut flour bread and it turned out so good! This recipe is great! I added an extra 30 min per stretch and fold but kept everything else the same. Thank you!
Hello wanted to know for kamut did you use the same measurements it requires I have the white flour kamut and the whole wheat kamut
Glad to hear it was a success!