This easy sourdough bread recipe is as foolproof as it gets. From start to finish, you’ll learn everything you need to know to make bakery-worthy loaves.
Whether you’re a seasoned baker or just trying homemade sourdough for the first time, you’ve landed in the right corner of the internet. This sourdough bread recipe is the most “beginner-friendly” sourdough recipe you’ll find on the internet — I promise! When I started out, I, too, was overwhelmed by the sheer amount of different sourdough recipes and techniques and the amount of time some of them took (some take a few days!).
So, I set out to make a beginner-friendly version that will get you started with a delicious basic loaf. This sourdough bread recipe only has one “stretch and fold”, an overnight rest, one “shape” in the morning, then bake. That’s it! It’ll set you up for a strong foundation to continue on and one day have the courage for more “complicated” loaves (but then, they actually won’t seem so complicated!).
With just a little technique and the right tools, sourdough bread-baking is actually quite straightforward. Get ready for your house to smell like heaven and for an unparalleled taste!
Sourdough Bread Recipe Video
Kitchen Tools You Need for Sourdough Bread
Before we dive into the recipe, let’s cover off on a couple of essential tools that make the process that much easier.
- Proofing Basket – This is the set I own! It comes with two proofing baskets, a handy scoring knife, and a dough scraper.
- Dutch Oven – The Staub Dutch oven is my go-to, but feel free to use any brand!
- Dough Whisk – This dough whisk makes combining all the ingredients a piece of cake and removes pesky bubbles and lumps.
- Sourdough Starter – You can make your own starter, buy one, or ask a friend to lend you one. If you want to go the homemade route, consider this book your sourdough starter bible!
How to Make Sourdough Bread
In general, sourdough bread does take some patience and a little bit of technique. But here, you’ll need very little! Why? Because this is the crazy easy version! Here, you’ll find the instructions broken down accompanied with handy photos for all you visual learners out there.
Prepping the Dough
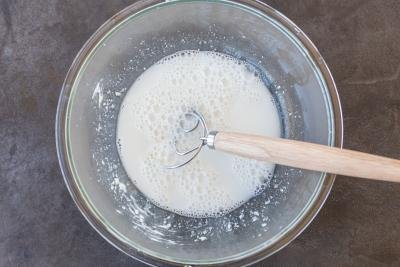
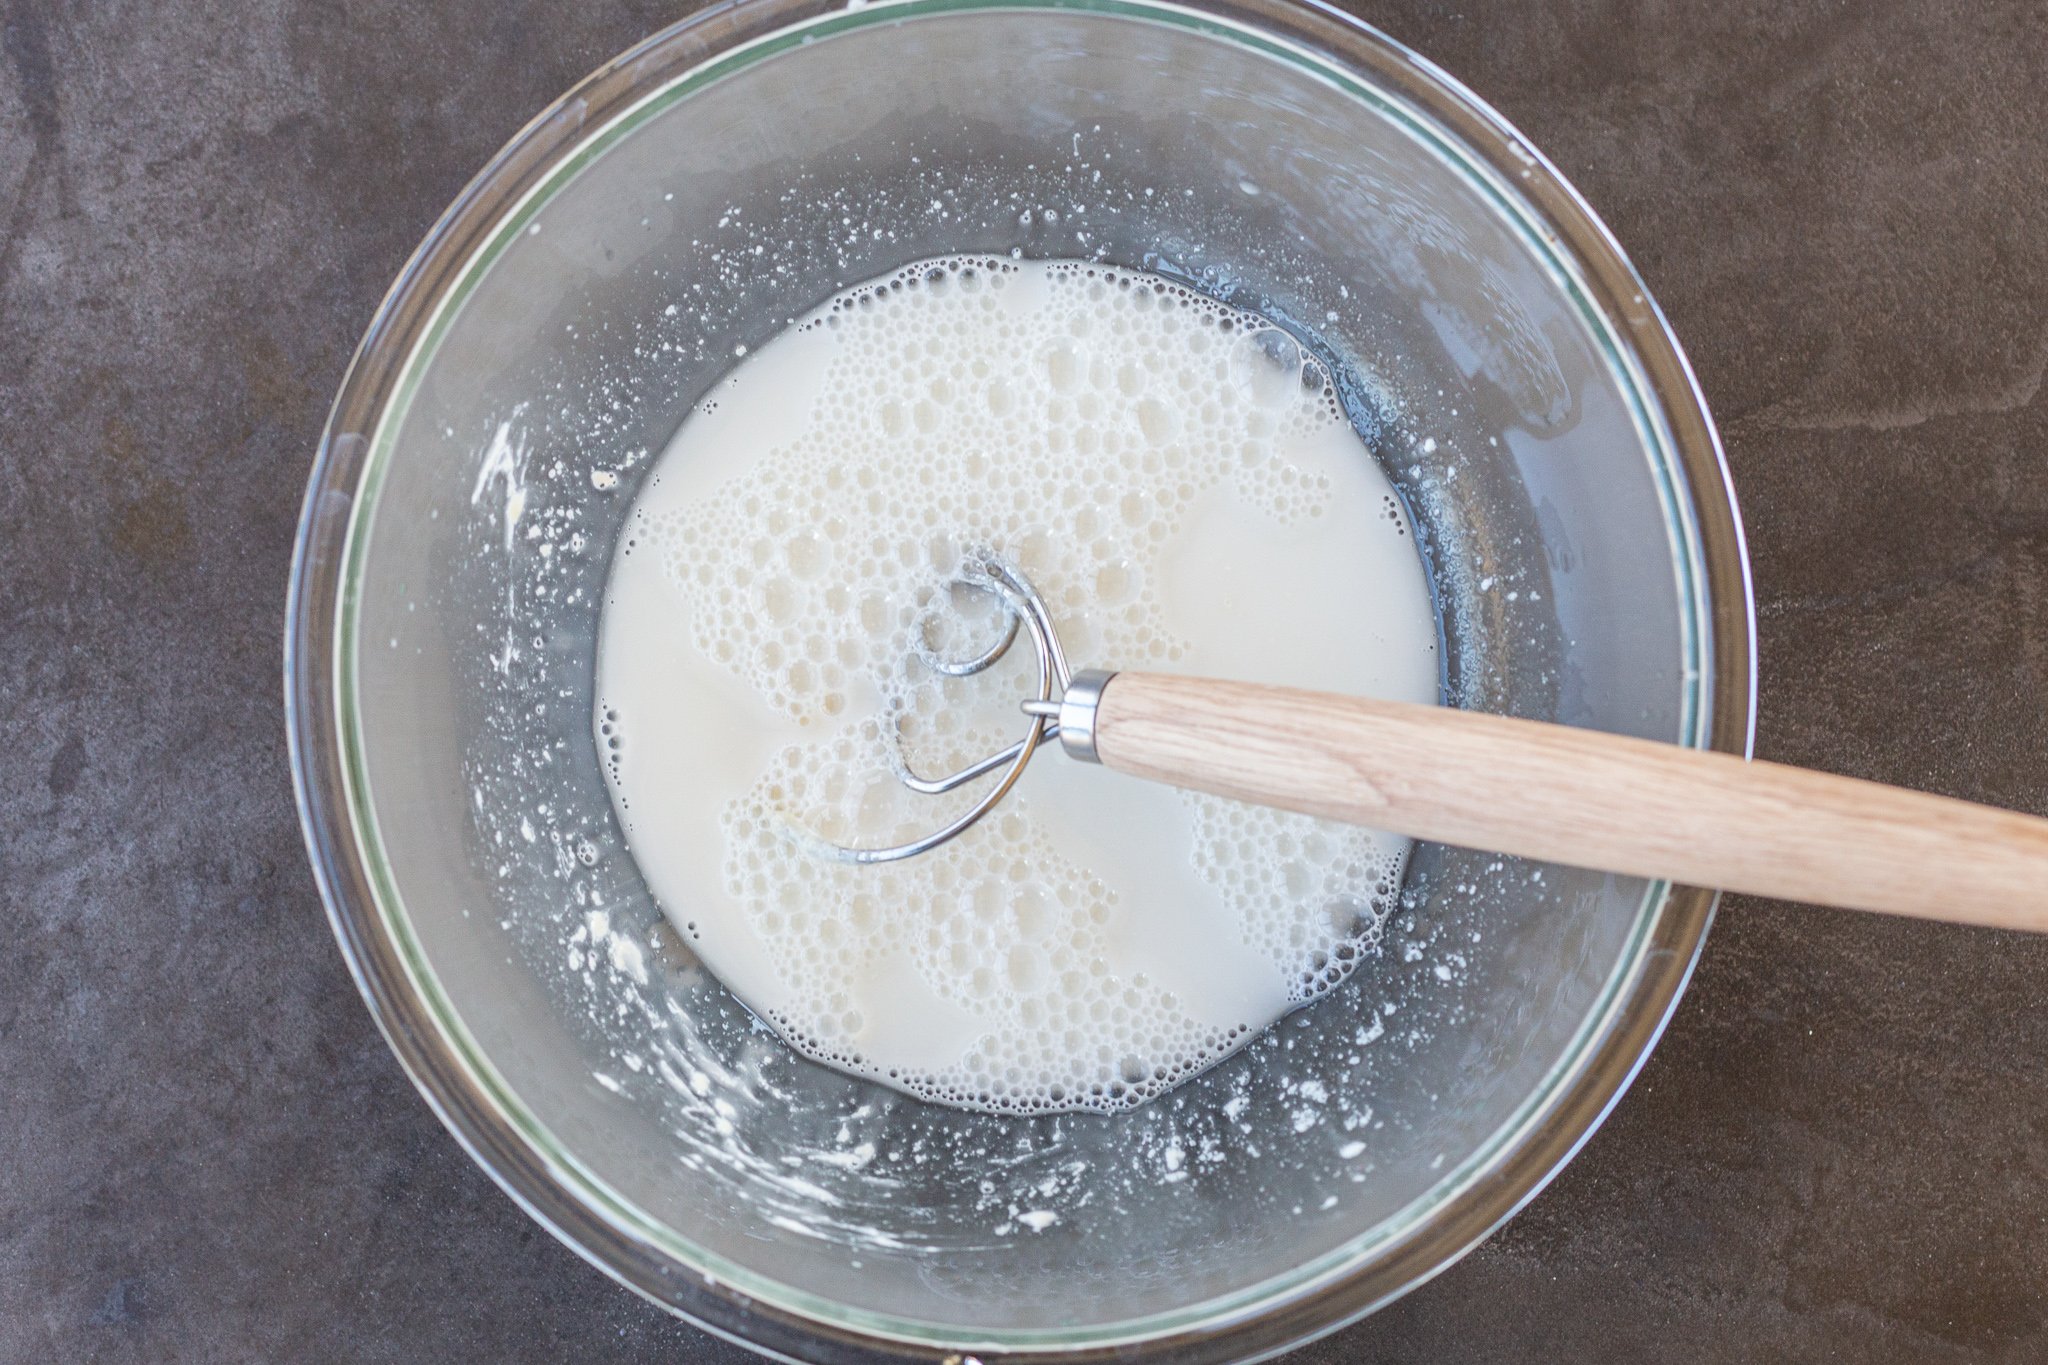
- Combine the water & starter: In a large mixing bowl, whisk the water and sourdough starter together. Spoon in the salt and whisk again.
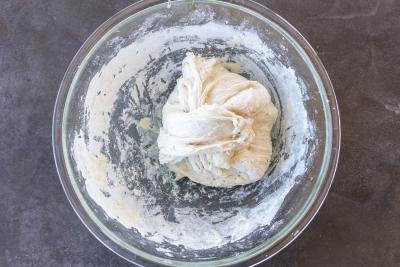
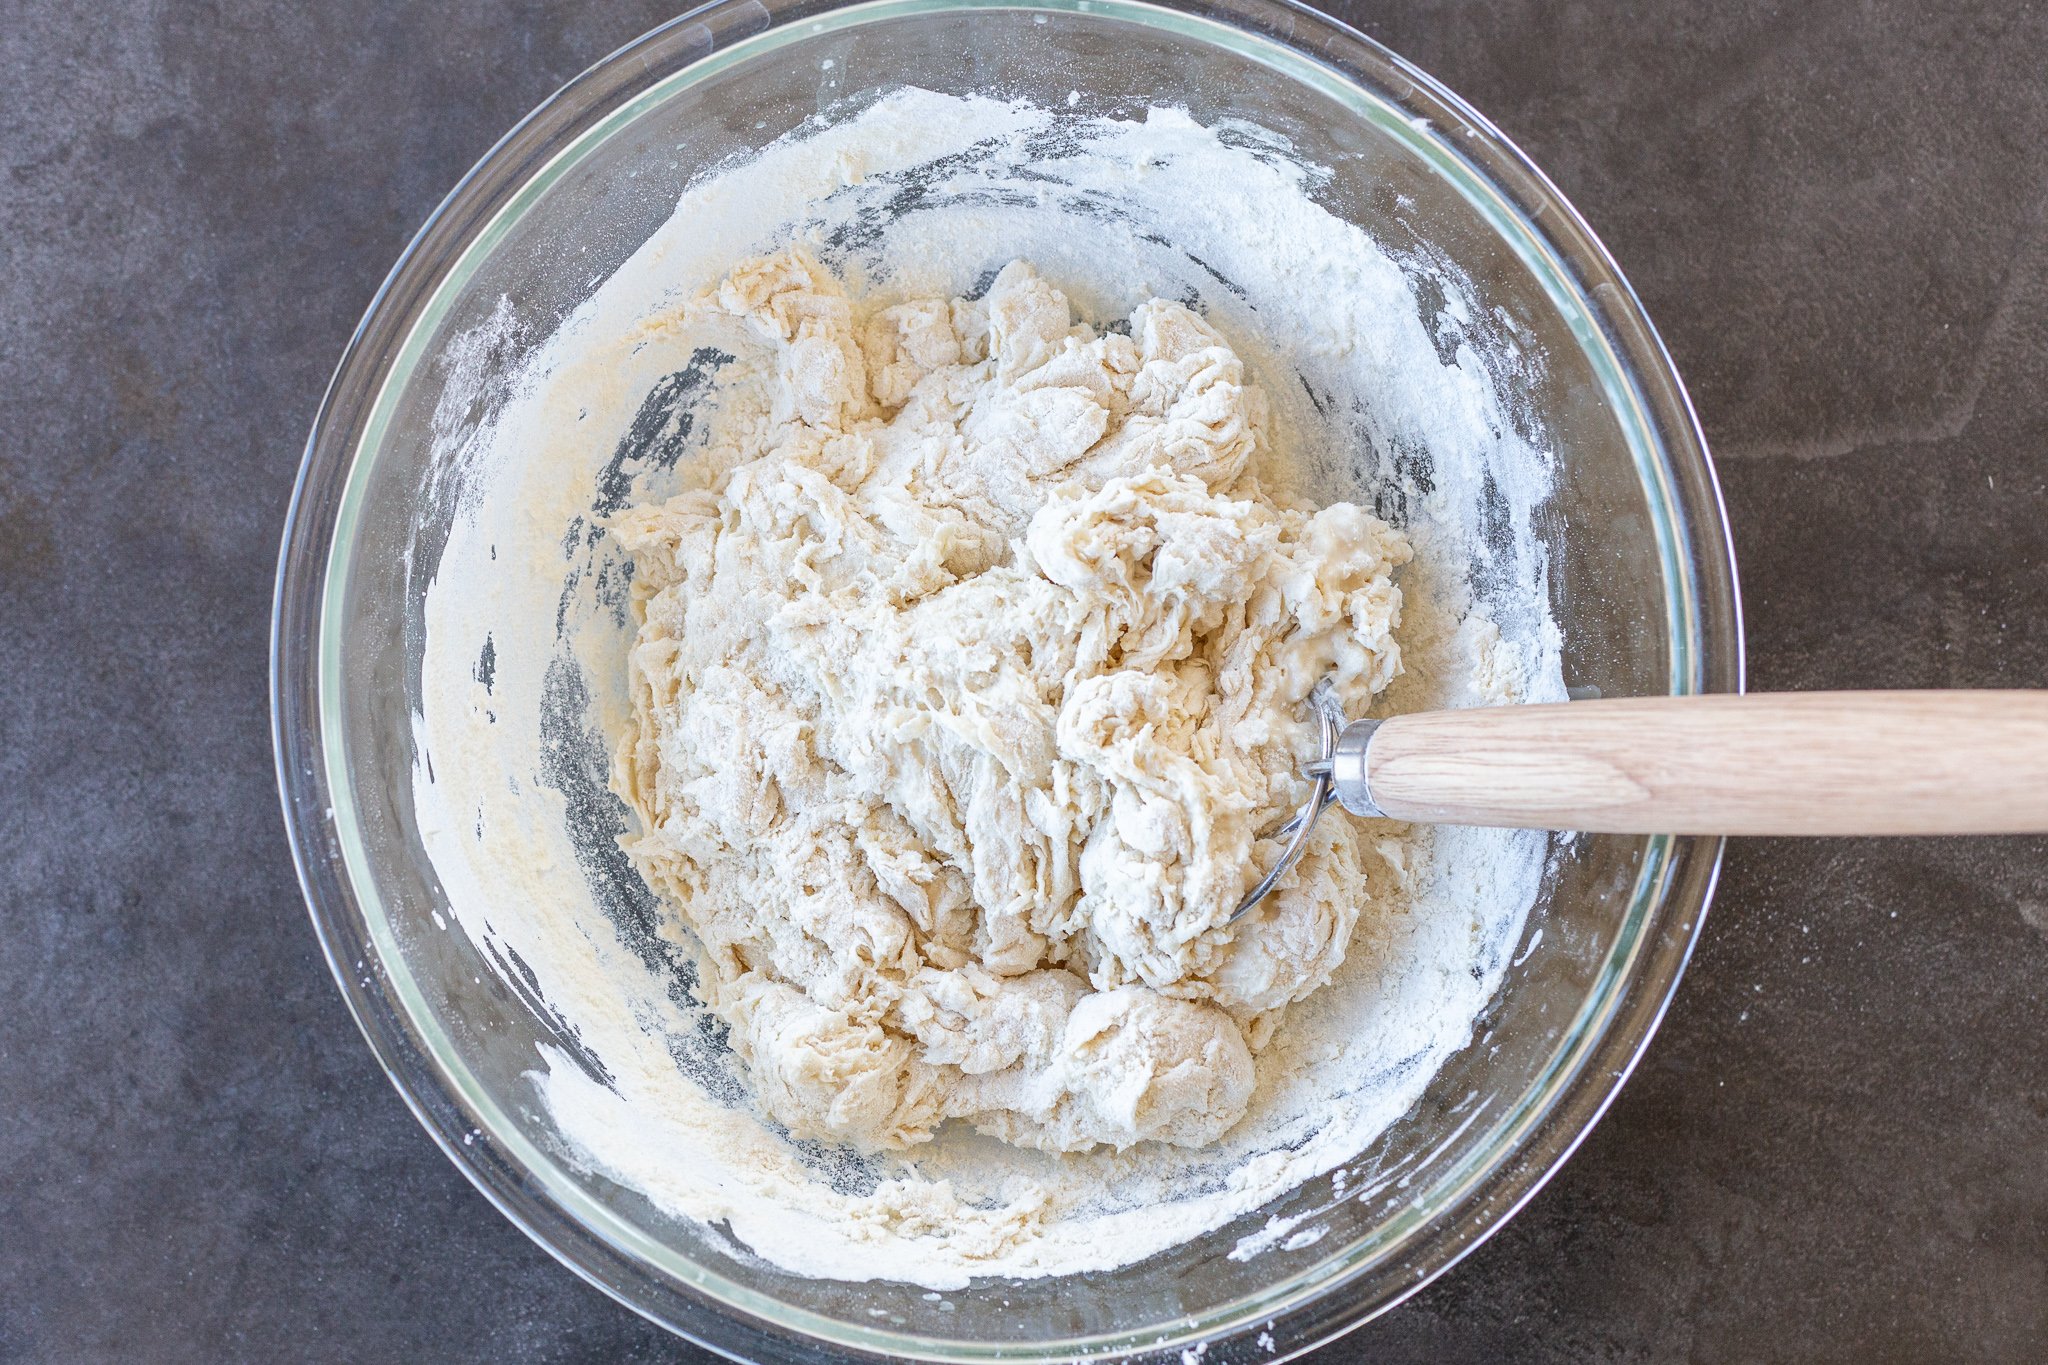
- Add in the flour: Next, stir in the flour until the dough looks dry, rough, shaggy, and a bit sticky.
Pro tip: To make bread dough more exact, get a scale and measure 520 grams of flour, 325 grams of water, 90 grams of the sourdough starter, and 1 tsp salt.


The First Rise (aka “The Resting Phase”)
- Cover the dough: Next, cover the large bowl with plastic wrap. Let the dough rest at room temperature for 30 minutes (this is when the gluten will begin to develop and the bread will gain a nice surface tension for perfect crust).


Shaping the Dough & the Second Rise (aka the “Bulk Fermentation Rise”)
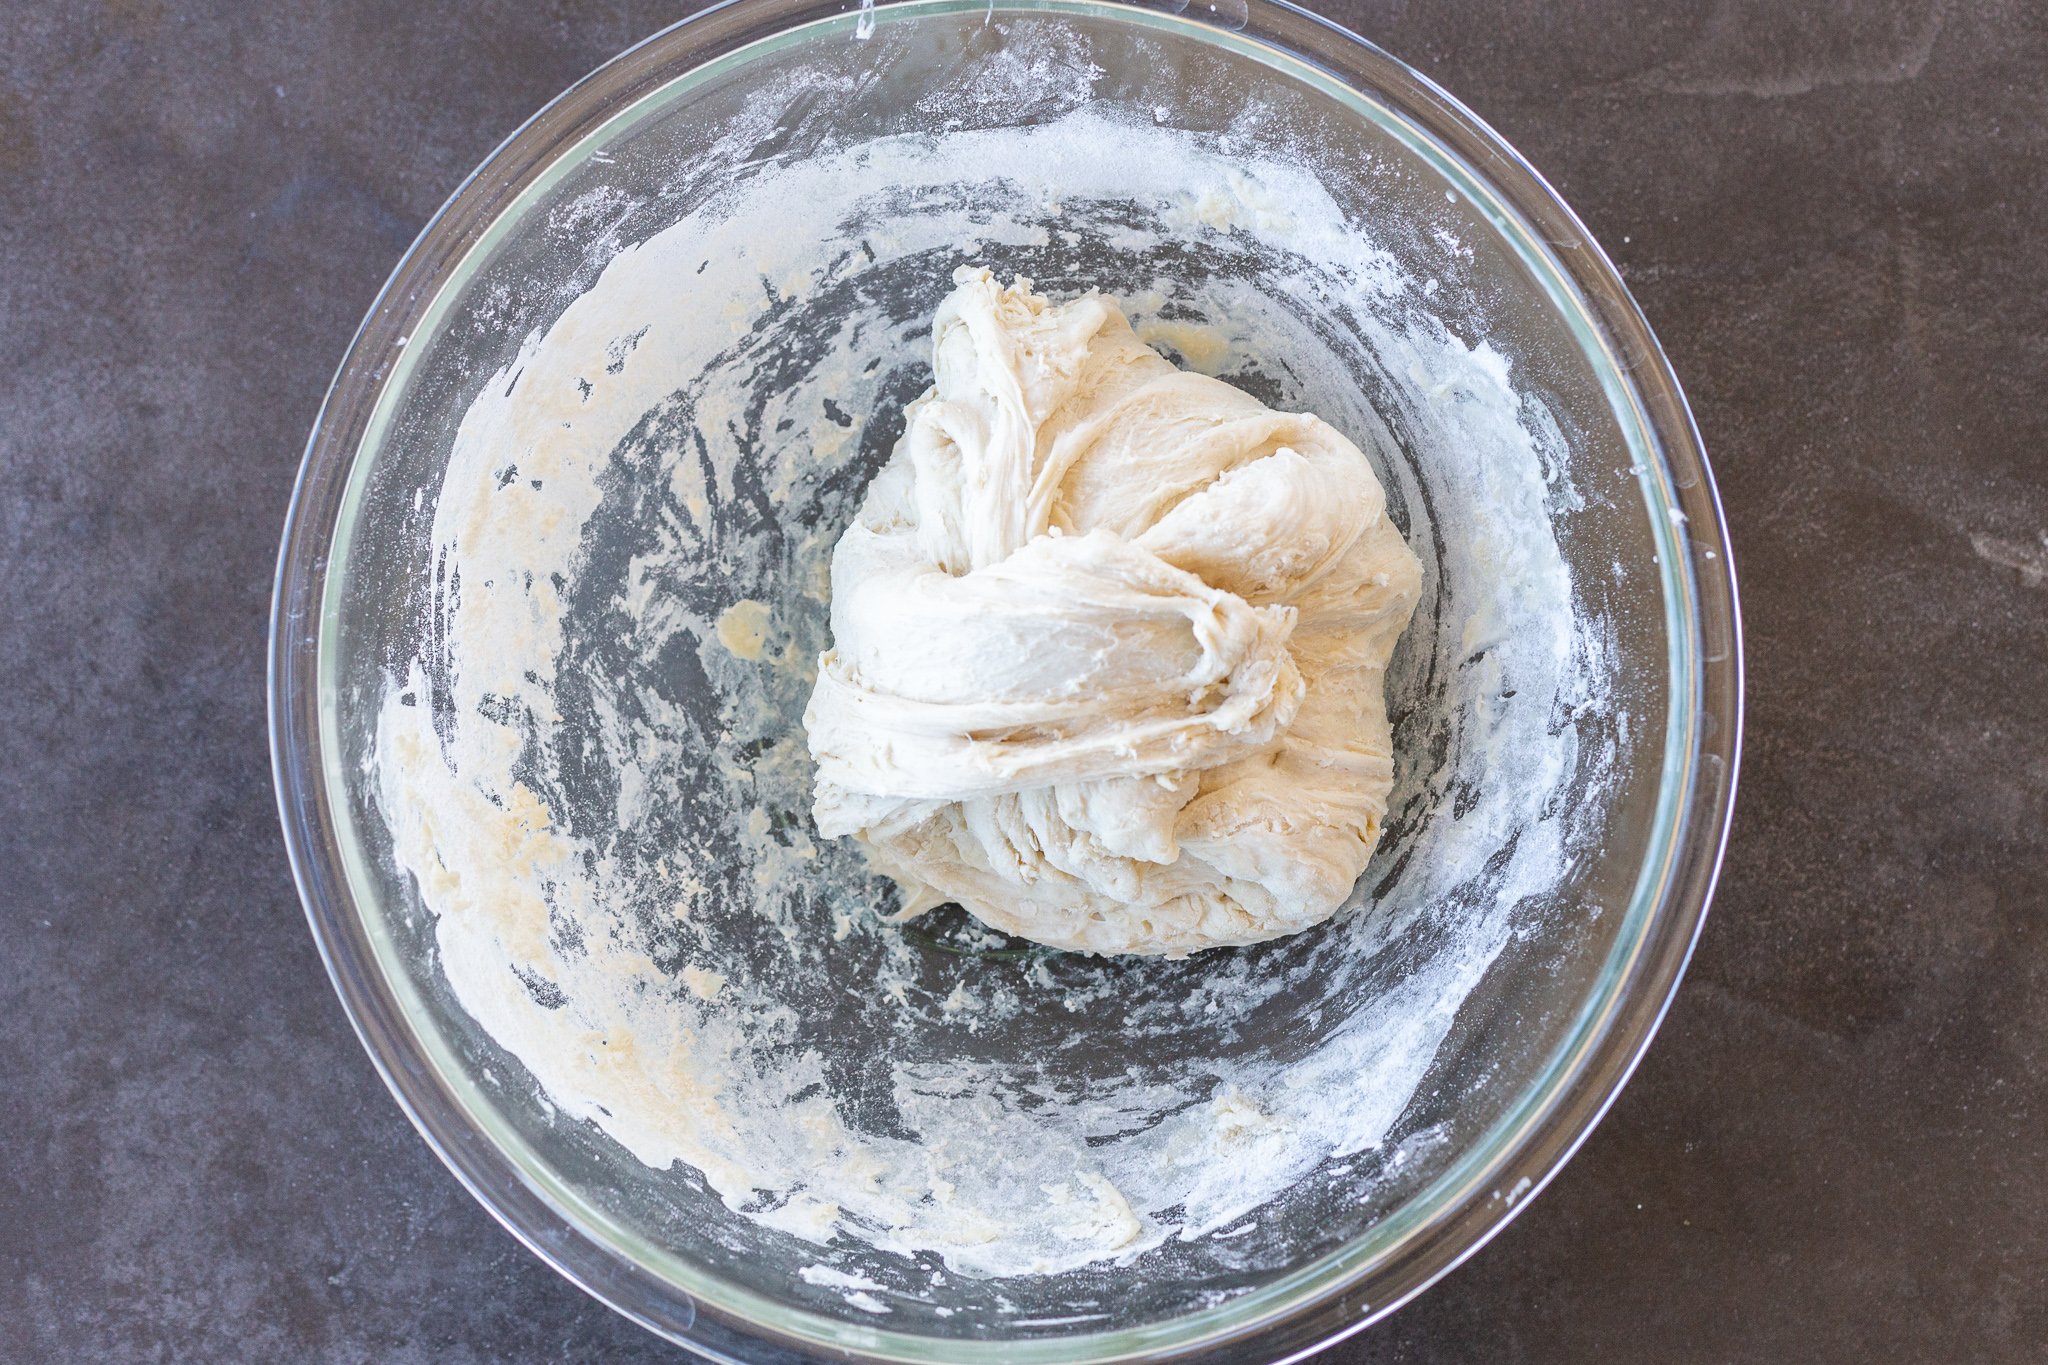
- Shape the dough: Next, fold the sides of the dough over into the center to form a ball (this is a great time to fix any errors. Is there flour lingering at the bottom of the bowl? Incorporate it! Is the dough too sticky to handle? Add a bit more flour until it’s manageable!).
- Allow the dough to rise: Cover the bowl with a plastic wrap and let the dough rise on the counter for at least 8 hours, or until it doubles in size.
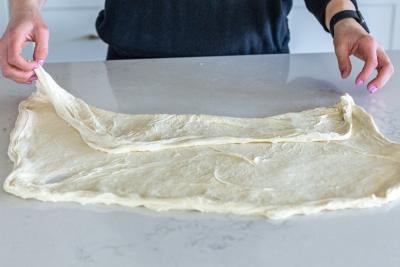
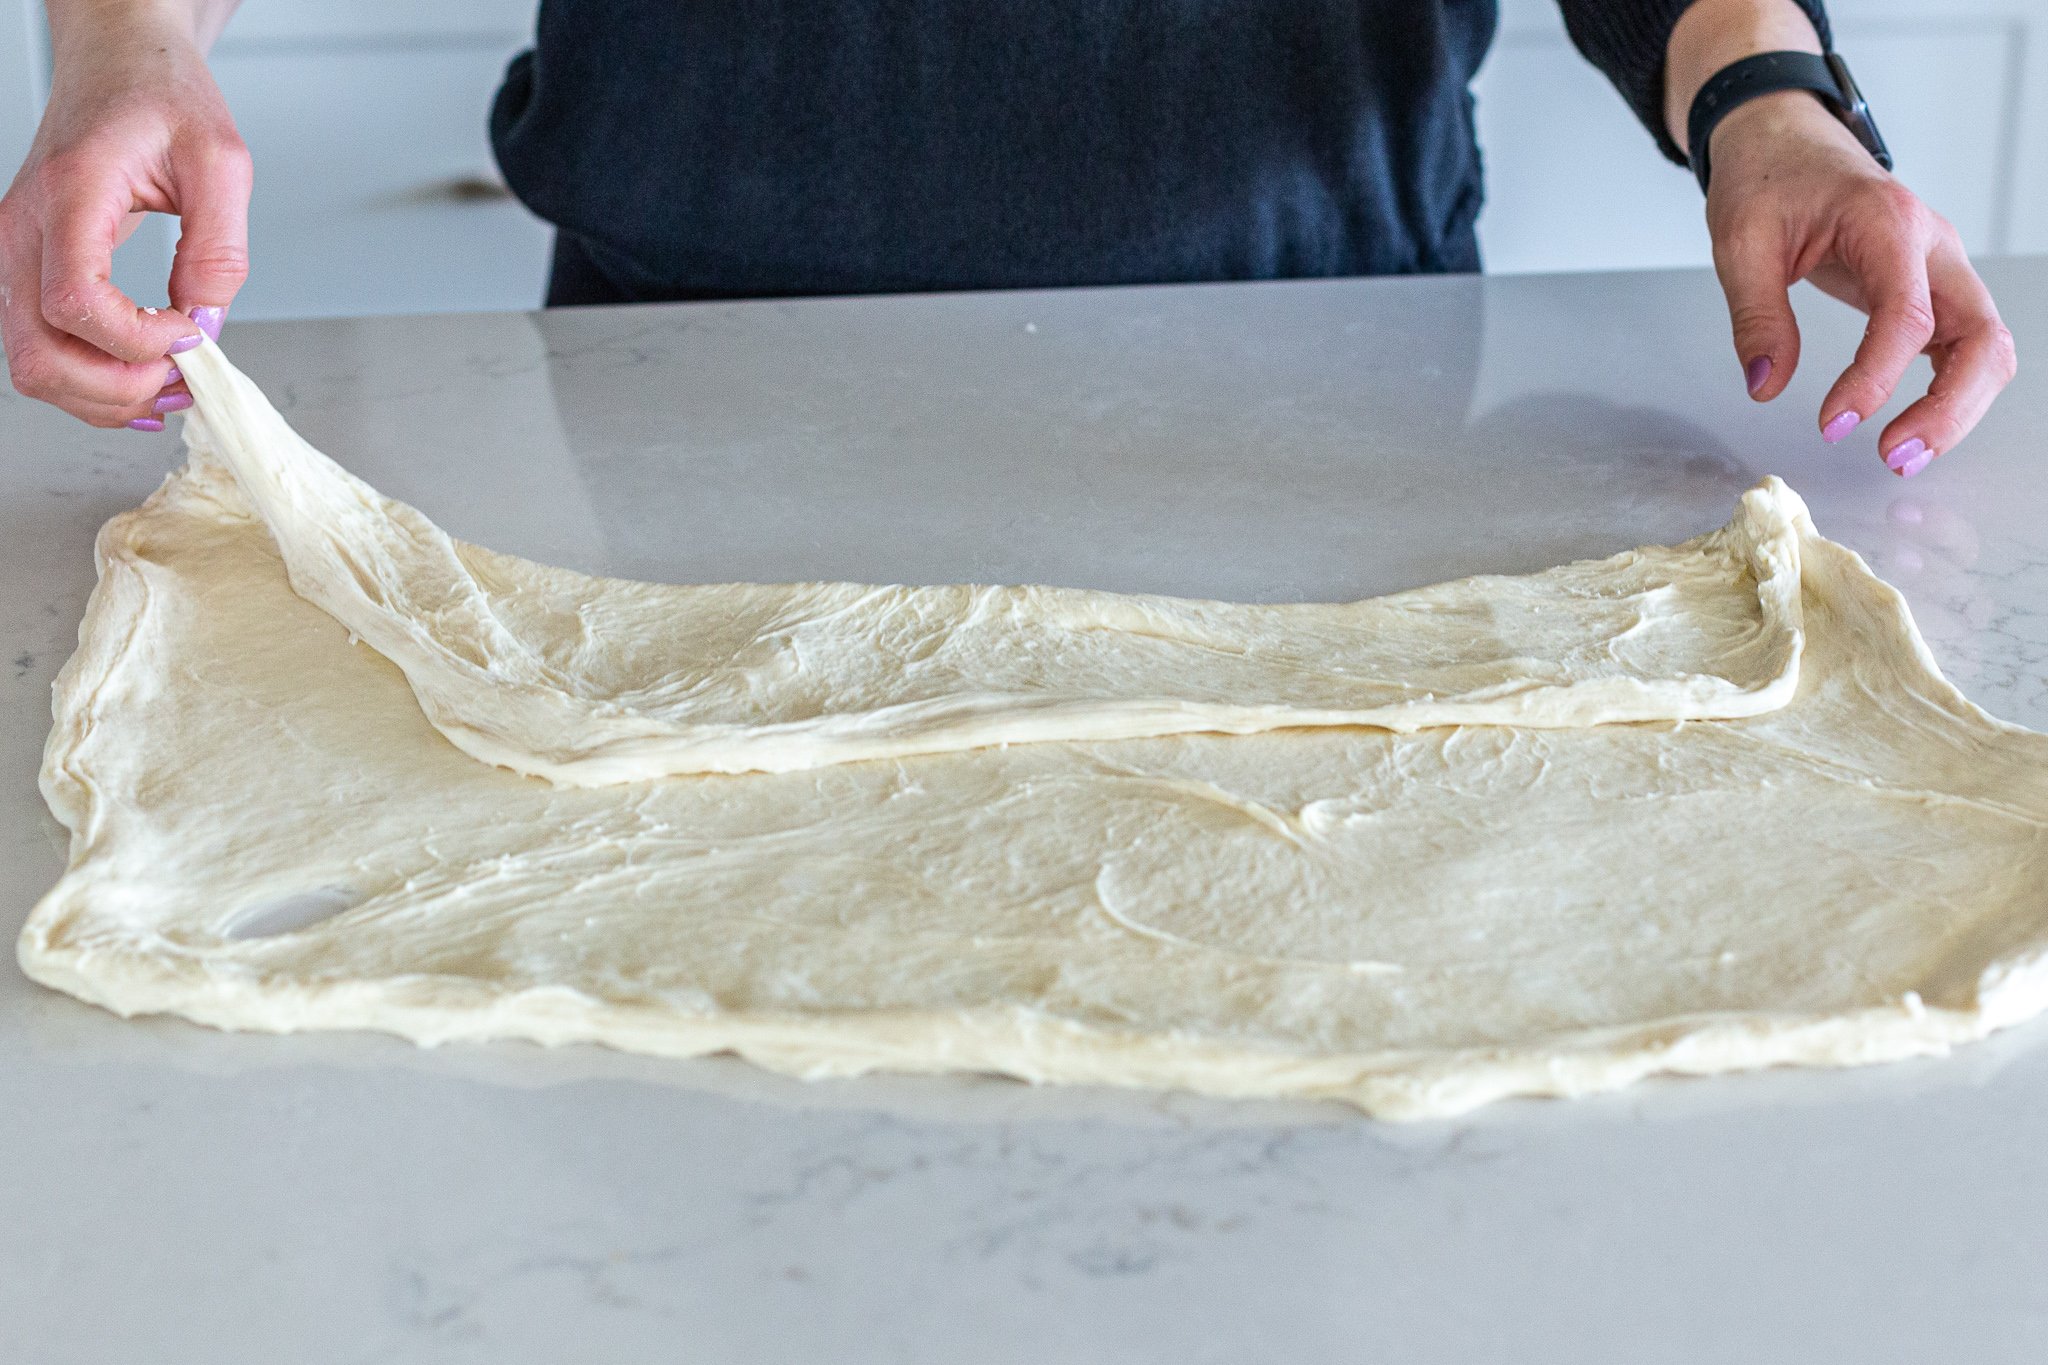
- Shape the dough: After the second rise, the bread dough should appear wet and bubbly. Place it on a floured work surface and stretch it into a large, rectangular shape. Fold it over into itself to form a small ball.
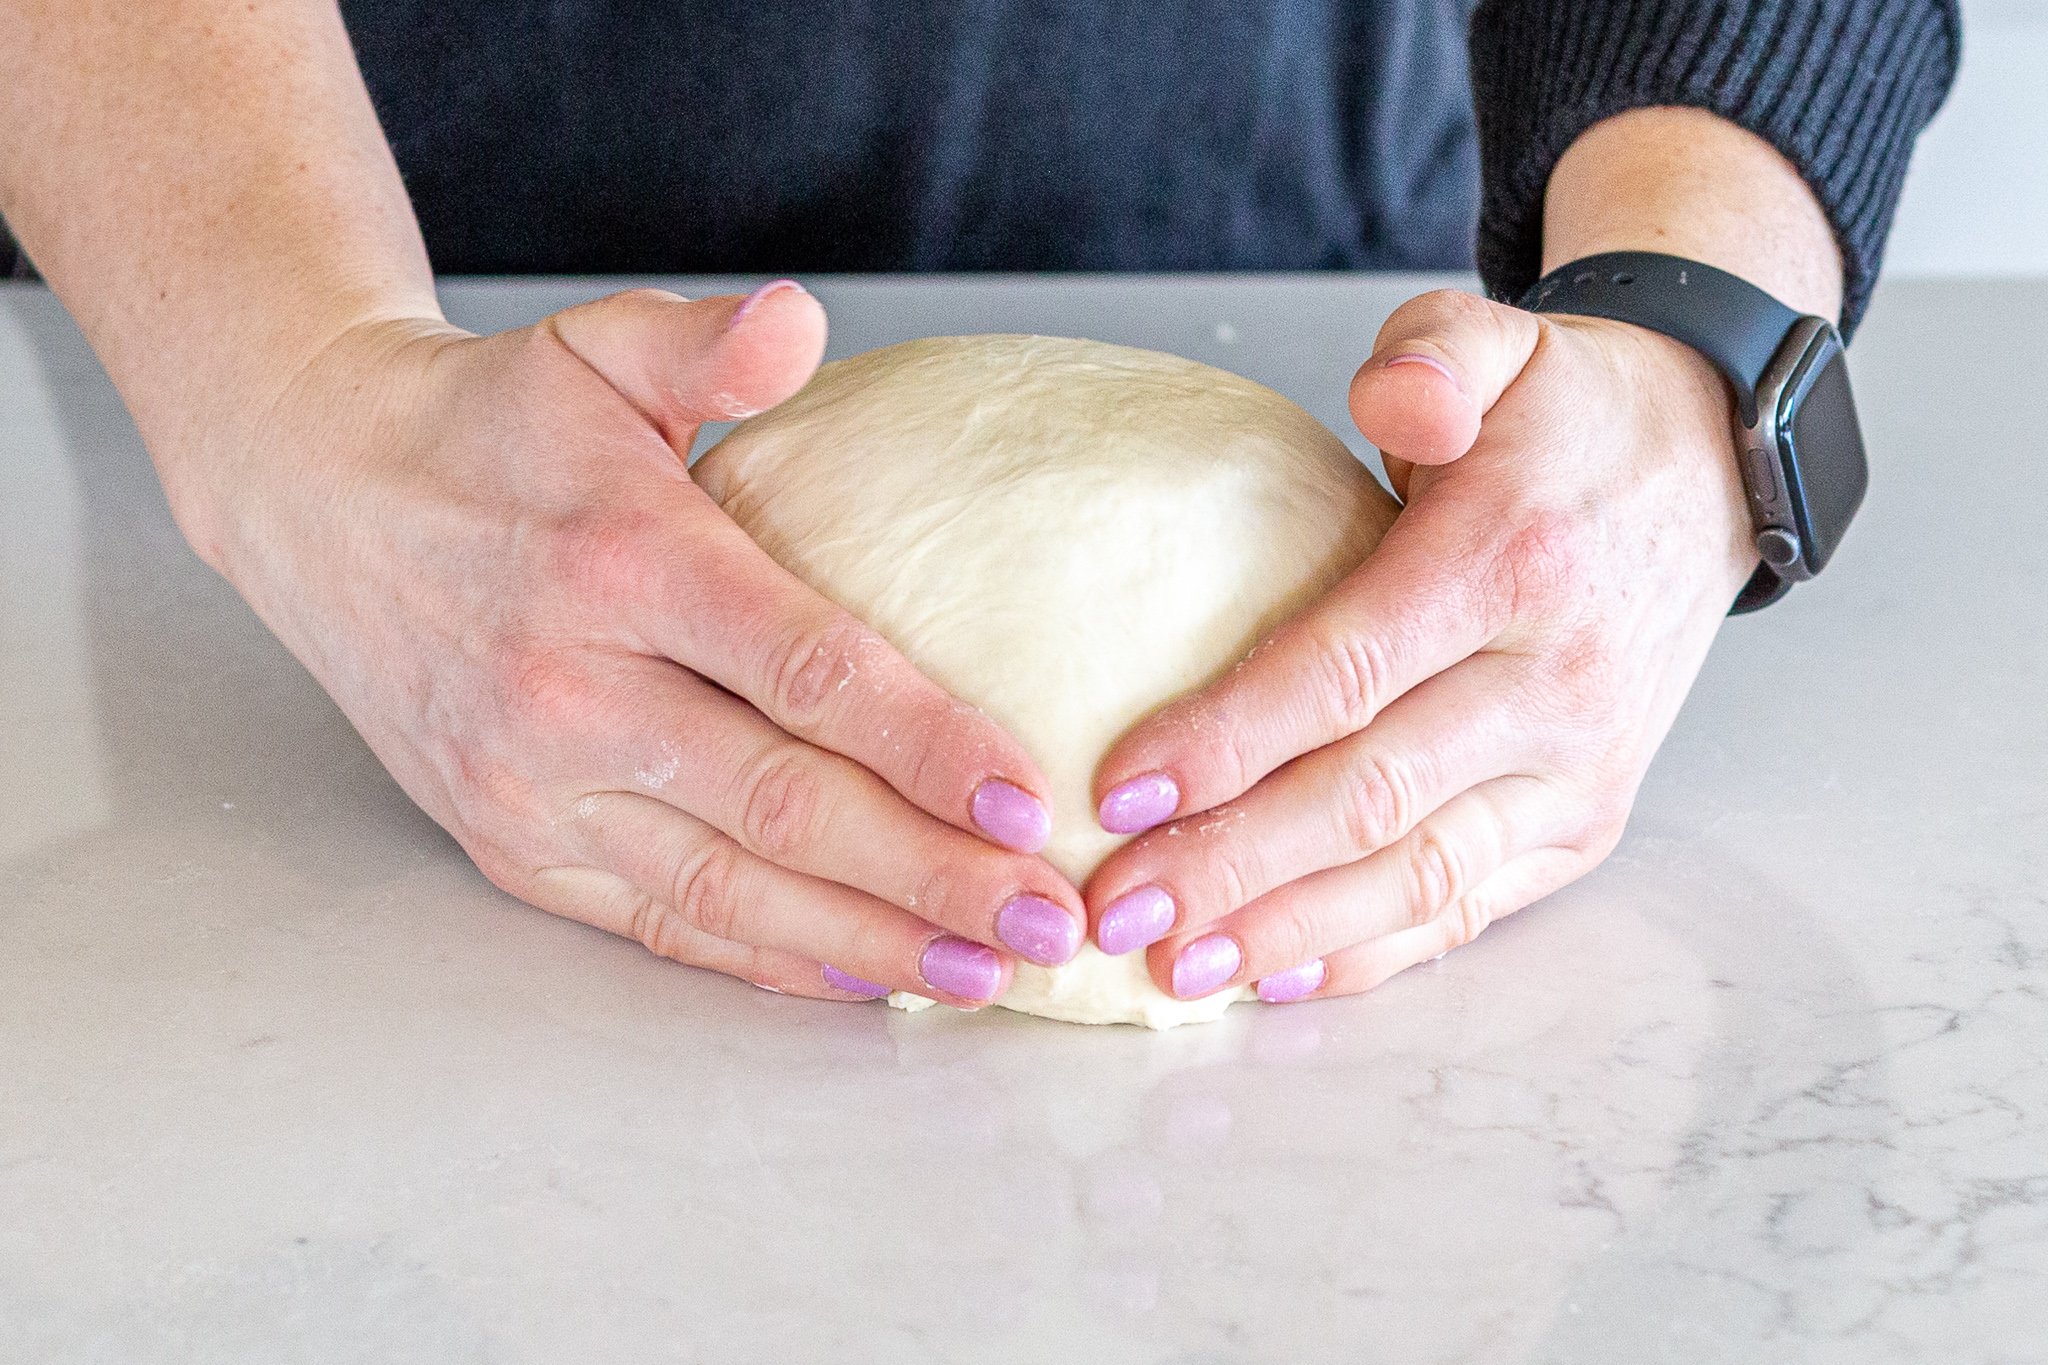
- Remove the blemishes: To finish the shaping process, push in the bottom of the ball with your fingers, while simultaneously shaping it into as perfect of a ball you can with your other hand.


The Final Rise (aka the “Bench Rise”) & Scoring
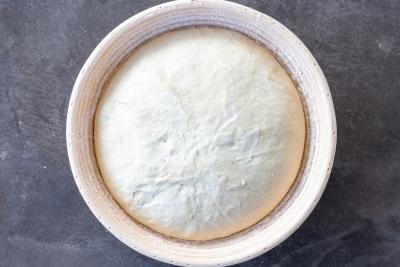
- Pop the dough into the basket: Next, place the dough into the dough basket with the seam side up. Cover the basket and let the bread rest for 45 minutes at room temp (or for a couple of hours in the fridge).
- Preheat the dutch oven: Pop the Dutch oven inside the oven and turn the heat to 450°F.
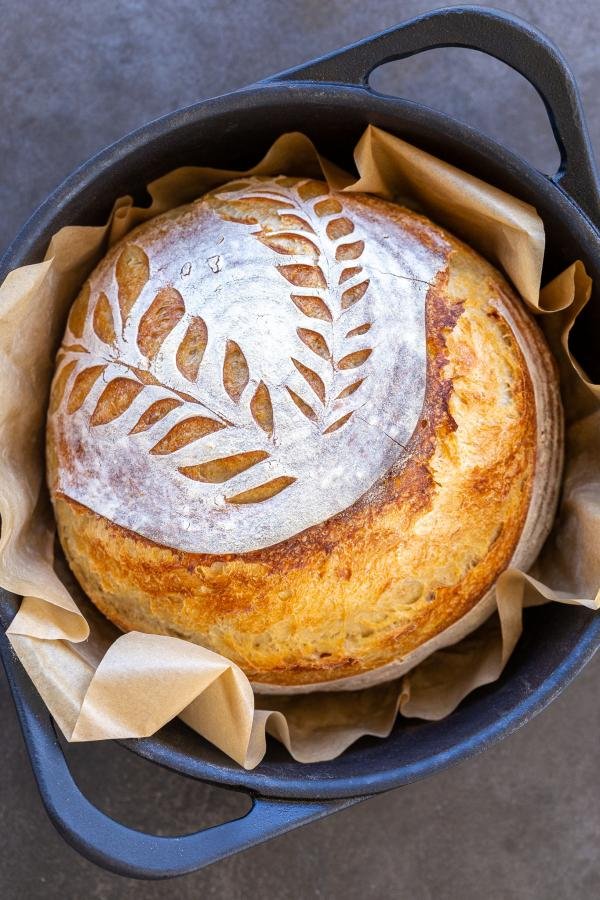
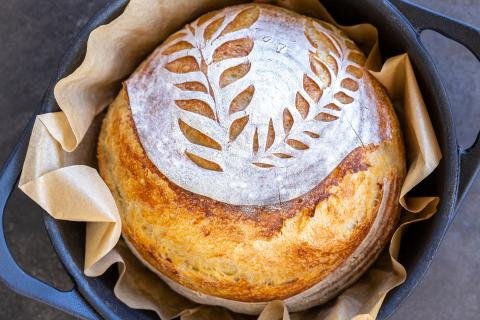
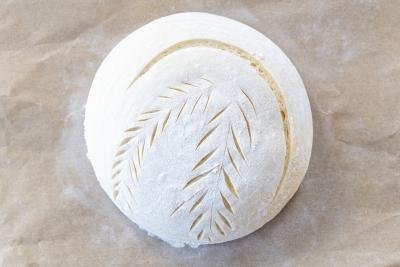
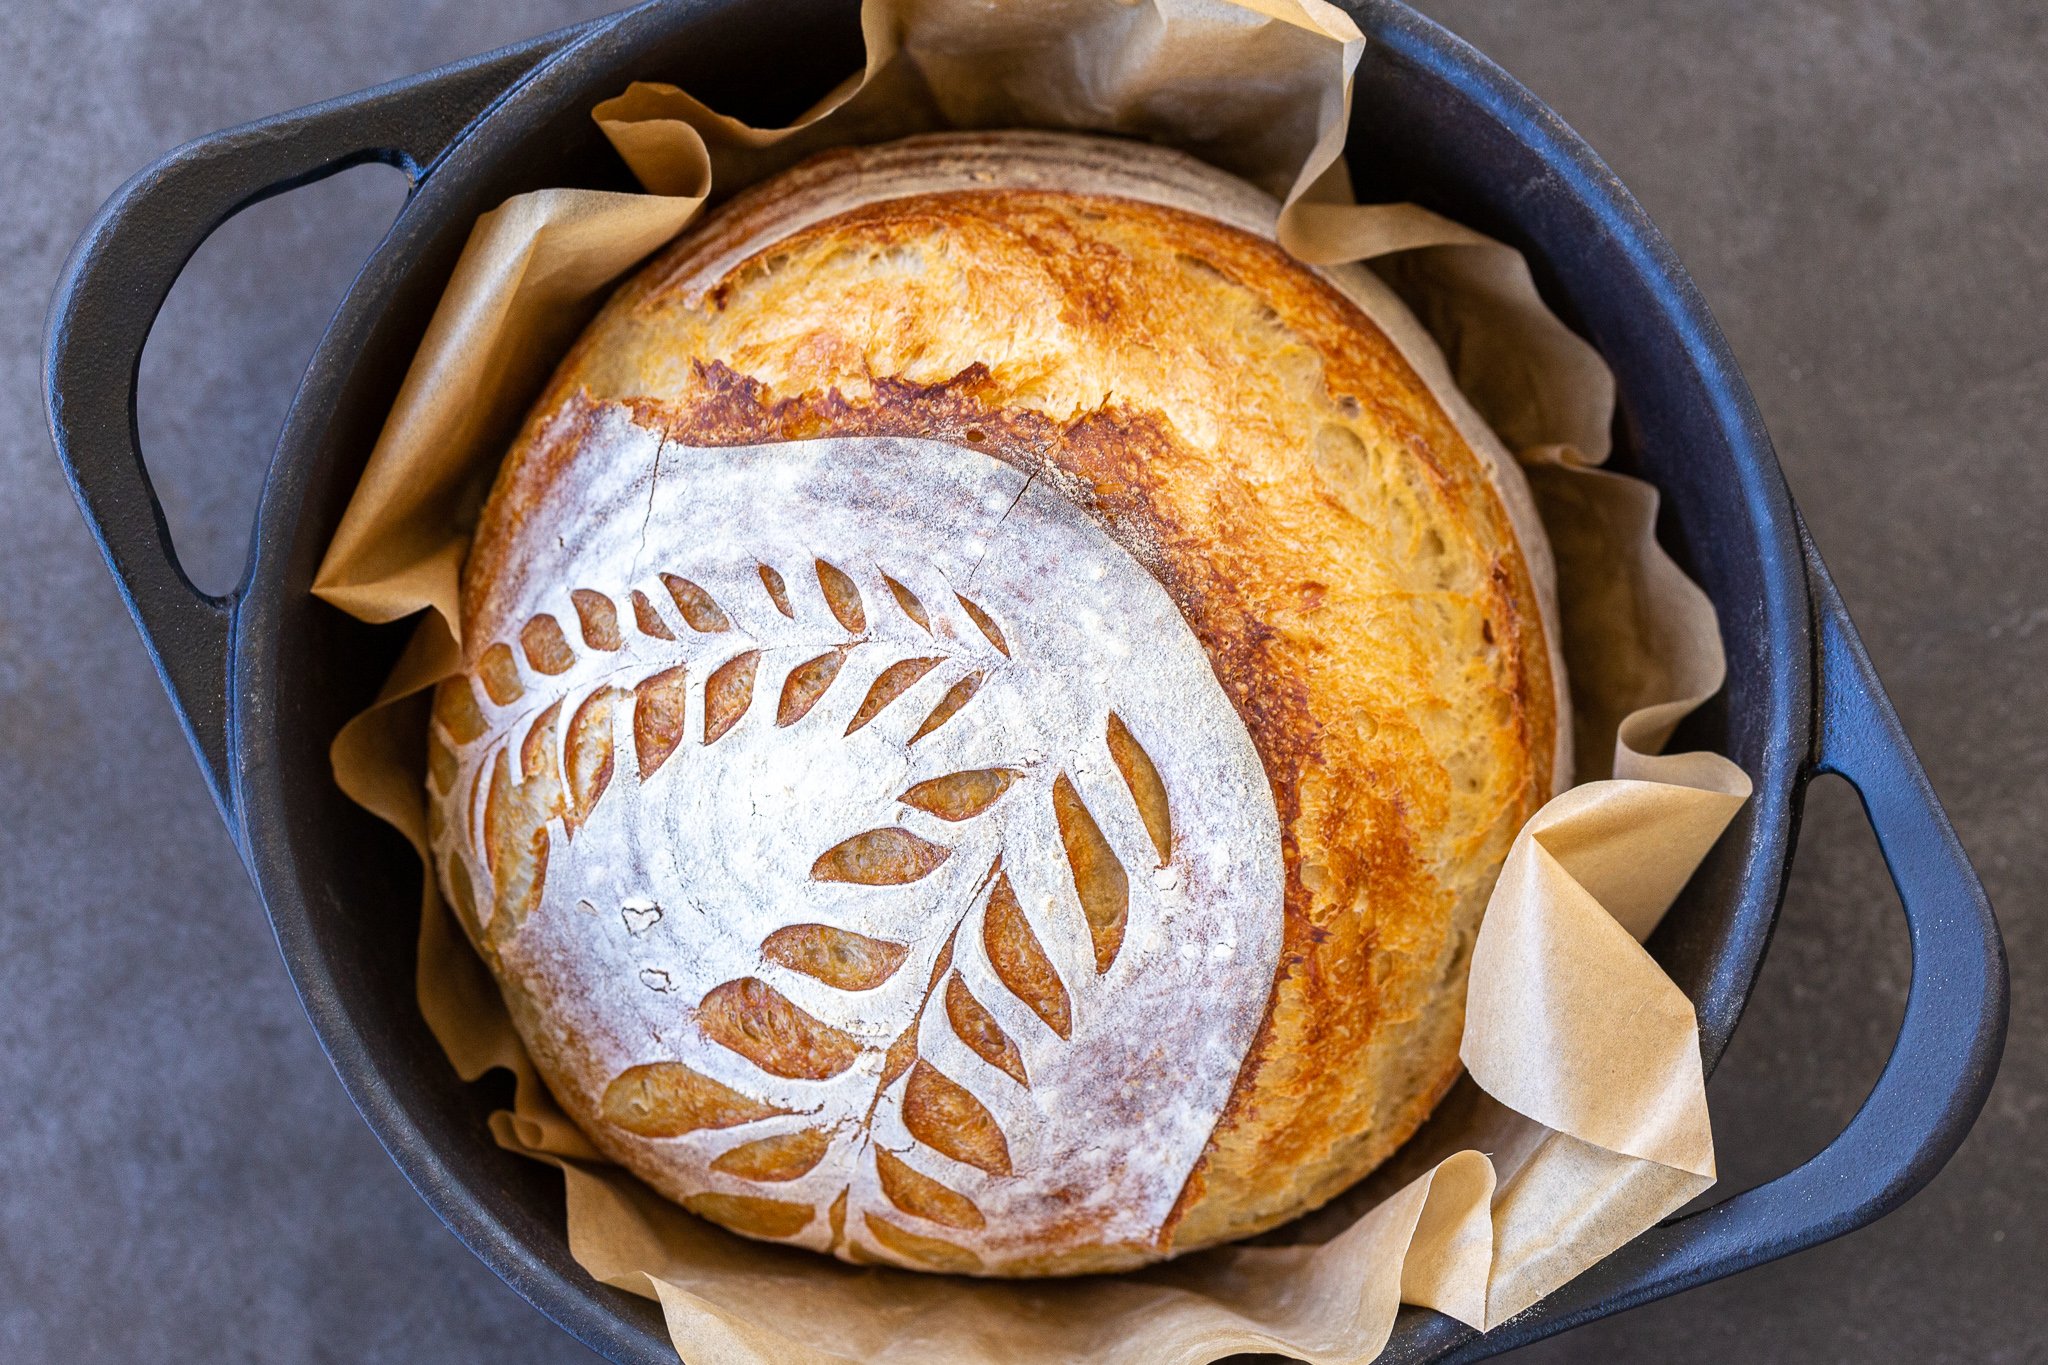
- Score the bread: While the oven is heating up, place the dough on a piece of parchment paper with the seam side down. Score the top as you please – get as creative as you want here!


Baking the Sourdough
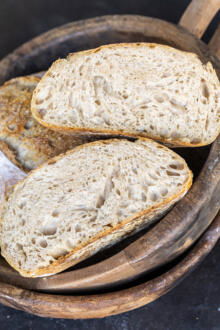
- Bake the sourdough: Next, place the bread inside the Dutch oven and bake it for 30 minutes with the lid closed. Remove the lid and bake it for an additional 20 minutes. Give the bread a bit of time to rest and then pull it out to sit on a cooling rack on the counter. Slice it with a sharp knife and enjoy!


Helpful Tips & Tricks
A couple of simple tips and tricks will help you bake this sourdough recipe like a pro.
- Fully incorporate the ingredients for the dough. When you’re first mixing the ingredients together, make sure that they are well-combined and there’s no pockets of flour or salt. You don’t want to bake these in!
- Don’t forget to feed your starter. To keep your starter alive, make sure to feed it 8 hours before you plan to bake. Equal parts lukewarm water and all-purpose flour will do the trick. Once it starts dropping back down, feel free to use it! See my complete guide on feeding and maintaining your starter.
- Know that the temperature of the water will affect the rise. The cooler the water you use, the slower the rise. The warmer the water, the quicker the rise. Depending on the temperature and season, you can adjust the temperature of the water to control the rise (think: use cold water and an overnight rise in the summer to compensate for the hot temperature outside).
- Don’t rush the resting. Each rise serves a specific purpose, so don’t rush the process. Patience is key when it comes to bread-making!
- Mark the bowl to know when your dough has doubled in size. To gauge when the dough has doubled in size, mark the bowl at the level it sits at pre-rise.
- Use a razor blade if you don’t have a scoring knife. If you don’t have a scoring knife, carefully use a razor blade to score the top of the bread.
- Use high-quality flour. Bob’s Red Mill Bread Flour is my top choice for it’s superior flavor and high-protein content (protein = great texture). King Arthur Bread flour is also a great choice!
Storing Sourdough Bread
If you see me baking sourdough bread on Instagram, you’ll often notice I make multiple loaves of sourdough at once. I love making a few extra to freeze or give away to family and friends. If you’re like me, check out these storing tips.
- Short term: A fresh loaf of sourdough bread is stable at room temperature in a plastic bag for 4-5 days. Beyond that, I put it in the refrigerator. The fridge does dry it out some, but I then use that bread toasted in a pan with a smidge of butter or in the toaster.
- Long term: I make extra loaves so that I’m not making bread every single week. After the fully cools, I pop it into a ziplock bag and freeze it for up to three months. When I’m ready to enjoy, I let it thaw at room temperature. Sometimes, I pop it in the oven for about 5-10 minutes and it comes out smelling (and tasting) as fresh as on day one!
More Tasty Homemade Bread Recipes
- Baguette (The Easiest Recipe) – Classic, French-style baguette
- Honey Wheat Bread – Slight sweet, hearty wheat bread
- Easy Dutch Oven Bread No Knead Bread (Video) – White bread round
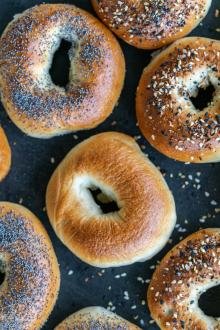
- Sourdough Bagels – Easy-to-make overnight bagels with customizable toppings
- Easy Whole Wheat Baguette – Hearty whole wheat baguette
Recipe
Ingredients
- 1/3 cup sourdough starter
- 1 1/3 cups lukewarm water
- 1 tsp salt
- 4 1/8 cups bread flour
Instructions
- In a large bowl, whisk the water and sourdough starter together. Add in the salt and whisk again.
- Stir in the flour (the dough will look very dry and that's totally fine). Cover the bowl with plastic wrap and set it aside at room temperature to rest for 30 minutes.

- After the sourdough rises, fold the sides of the dough over into the center to form a ball. Cover the bowl again and let the dough sit at room temperature for at least 8 hours. After the dough rises, it should appear wet and bubbly.
- Flour your work surface generously. Place the dough on the counter and stretch it into a large, rectangular shape. Fold it over until it turns into a small ball of dough.
- To finish shaping the dough, push in the bottom of the ball with your fingers while shaping it with your other hand into a perfectly round ball. Turn it several times in a circular motion to work out any bumps or blemishes.

- Place the dough into a dough basket with the seam side up. Cover the basket with a plastic wrap and let the bread rest for 45 minutes at room temperature or for a few hours in the fridge.
- Place the Dutch oven inside of the oven and preheat the oven to 450°F.
- Place the dough ball on parchment paper with the seam side down. Score the top as you please.
- Place the bread inside the Dutch oven. Bake it for 30 minutes with the lid closed. Remove the lid and bake the bread for an additional 20 minutes. Let the bread rest for a bit before slicing into it and enjoy!


Im wondering if 450 isn't too high. My bread looks burnt.
Hi Tammy! I've tested this recipe with this oven temp multiple times and it works well for me! Each oven is different though, so yours may run hotter. Is it the bottom of the bread that looks burnt? If so, try adding a metal baking sheet under your dutch oven while baking the bread and see if that helps!
What size dutch oven do you use in this recipe?
I use a. 5.5 quart, the one I like is linked in the blog under the "Kitchen Tools..." section.
Hello, after I added 4 1/8 c of flour, dough was tough. After 8 hrs. Dough did double somewhat, but it was a little tough to stretch, since it wasn’t really stretchy & not as moist…. Just curious if it’s too much flour or not enough water? Did follow every step though…
I've made bread with this recipe multiple times and I have this same issue. I have to add more water every time. May e using a different flour requires more water? I don't know but the bread always turns out great when I add water!
Try measuring the flour on a scale . When scooping it is possible to put too much flour.
4 cups and 1/8 of a cup are equal with 516 grams.
Hey Olga, If the dough is too stiff, it might be due to either too much flour or not enough water. You could try adding a bit more water next time, especially if it feels tough to stretch. But I think the dough might've needed more than 8 hours to develop- it should be appear wet and bubbly. Next time try adding a few more hours esp. during the cooler months.
Love this recipe very much have used others before and they didn’t turn out as this one have been using this one for about three years now and it’s our absolute family favorite. Thank you for sharing.
That makes me so happy to hear! 🥰 Three years of baking with this recipe—what an honor! I love knowing it’s become a family favorite. Thank you for taking the time to share your experience, and happy baking!
So the bread turned out yummy but the top burns to much. How can I adjust the temperature so it can still cook?
I'm happy the bread turned out good! Did you have the lid on for the first portion of baking?
Baked my first sourdough bread today using your recipe. I was so nervous but it turned out great, thank you for making it so easy to follow!
That’s awesome! I’m so glad it turned out well for you. I totally get the nerves—it’s always a bit of a leap when you’re trying something new, especially with sourdough, but I'm thrilled it was great!
I used your recipe for sourdough bread and made a few loaves already, they turned out perfect each time. I love how simple the recipe is, no dozen stretches required, thank you so such an easy recipe.
That’s fantastic to hear! Simple and delicious is always the goal.
Ok, so maybe I did something wrong. But when I covered by bread with a towel for 8 hrs, it was all crusty and hard on the top and of course when I tried pulling it into a ball it kept on ripping apart on the top. Then I watched the video, and there you have the bowl covered with plastic??
Hey, usually when I let it sit for a long time, I cover it with a plastic wrap. Thanks for flagging this, I will add to also add plastic wrap. We don't want dry pieces of the dough int he bread. 🙂
Thank you for the best recipe 😋
You're so welcome! I'm thrilled you enjoyed it!
Thank you so much for this recipe! It came out beautifully, I got a large crest, the crumb it so airy and crisp and yet very fluffy chewey inside.It's by far the best sour dough bread recipe I've used yet! I failed dozens of times on other recipes that had raging reviews and I was so ready to give up until I found your recipe! I've noticed yours has so much less water than all the other ones and I am in a humid climate so I think that was alot of the problem I guess I'm just not good with high hydration either. But thank you so much this was so perfect!
You got me craving bread! Sounds like it came out perfect! I'm so happy to hear it was a success, especially after your previous attempts. Humidity can definitely affect baking, so I'm glad the lower hydration in this recipe made a difference. Thank you for sharing your experience, and I hope you make many more loaves soon!
Hi Natalya! How do I know when the dough is done rising? I know you said it should look wet and sticky but is there anything else I can look for to know it’s done?
Hey Natalie, Great question! The dough should have also doubled in size. Another good indicator is the poke test: gently press your finger into the dough. If the indentation springs back slowly but remains slightly visible, the dough is ready. If it springs back quickly, it needs more time, and if it doesn’t spring back at all, it might be over-proofed. I hope these tips help!
Hi, new sourdough baker here. How come my bread when baked, the inside comes out sticky? Does that mean its under baked? Or I am doing something wrong with my dough? I bake by the recipe temp and time. What can I be doing wrong?
I will say from my own personal experience this has happened to me when I keep handling my dog with wet hands. Ive had soo many gummy interiors with doughs that have nor water in them. Usually when I stretch and fold I wet my hands and I've ended up adding too much water to the dough. I've learned with this recipe it's alot easier to handle without wet hands or ill add flour to my hands if it sticks.
Hi there, and welcome to sourdough baking! Sticky interiors usually mean the bread is underbaked. Try extending the baking time by 5-10 minutes and check for an internal temperature of 200-210°F. Also, sourdough needs time to set and finish cooking after being removed from the oven. Allow your loaf to cool until it reaches room temperature, before slicing. I hope these tips help with the next loaf, if not, let me know and we'll figure it out together!
I let it bake longer and it looks like its baked well and I let it cool before cutting and it still has this sticky texture to it. I wonder what Im doing wrong
Hmmm, so some other possibilities that come to mind is that your dough didn't proof long enough. Make sure your dough has risen during both bulk fermentation and final proofing, looking for signs like doubled size, a domed shape, and a slow spring back when poked. Also, if your dough is too wet, it may not bake through properly, so consider reducing the water, or adding a bit more flour in your next attempt. I hope these tips help for the next loaf!
My dough is currently sitting for 8 hours, but I made it before watching the video. I "Jumped to recipe" and used the metric version. Now that I am watching the video, I realize that the measurements in your video and in the metric recipe are different.
83.33 g sourdough starter (vs 90 stated in the video)
315.45 g lukewarm water (325 stated in video)
1 tsp salt
515.63 g bread flour (520g)
The recipe says cover for at least 8 hours, the video says 12 hours. I guess this will be a late night for me if I have to cover for 12 hours! LOL!
Hey BN, The calculator converts the ingredients for us, and while they're not exact the proportions still work. Thanks for flagging this though! Also, 8-12 hours depends on humidity and warmth in the house. I said 12 hours in the video because it was filmed in a cooler month. I hope to hear back how your bread turned out!
Well, you were right! It turned out absolutely beautiful. I've made 2 loaves, and they're both great. It's the first recipe I've used that holds its shape well, my designs show up, AND gets an "ear" when baked. I'm so pleased! Thank you!
I don't know how it works so well with so little attention (no stretch and folds every 30-60 minutes), but it's great!
Yay! I'm thrilled it was a success!
Love your Sourdough recipes! I tweak them a little but I love how simple you make it, step by step and not too much unnecessary info/comments! I bake this bread for 20 minutes covered and 15 minutes uncovered. Otherwise it burns a little. Also, I've noticed the bottom of my bread baking faster than the top so I use my little rack from my instant pot to lift the bread up and it cooks evenly.
Hey Ksusha, That's a great hack - using the instant pot rack to lift up the bread! Thanks for sharing and I'm so happy to hear you love our sourdough recipes!
Thank you so much for the easy recipe the bread turned out great! I tried a lot of recipes and yours is by far the best. I didn’t use the scale but cup measurements and I’m exited how it turned out!
I'm thrilled to hear you think it's the best! Thanks for sharing Inna. 🙂
Is it ok to use the starter after longer than 8 h after feeding?
Hi Alina, as long as the starter is active. I think this post might be useful for you: https://momsdish.com/feeding-…
In step 1 where you mix your sourdough starter with water, it mixed beautifully. Then i added 1 tsp salt and mixed it and the salt made my starter clump up and stick to the whisk. Is that normal? Will my sourdpught bread turn out?
Hey Tasha, that can happen but what you can do is add salt with flour. The bread still turns out great but this is pretty normal. I think I need to switch it to add salt with flour so its not concerning. Thank you for flagging this.
Hello part 2 of 1!! OK - when I feed my "SDS" YESTERDAY MORNING - & TO MY EXTREAM SURPRISE - MY REGULAR "SDS" had the look as if it had been over fed 10 cups of flour water!!!! I had been feeding it 2 cops flour 2 cups water 3 times in 36 hours & nothing like this happen B4?! So half of this 4 liter container had risen well past the top of the 4.liter container!!! I promise U I am trying hard to get to the point!!! My "SDS" HAD been more thin then think B4 yesterday morning - after this feeding which (within 30mins)hard produced moren then what was already in the container!! OK getting to my Q & after all this hoping I have the answer to it all! I know for certain this is well beyond alive!!! Here is where is gets CONFUSING!!! There is not a hint of sour smell @ all - smell very much like yeast!!! & If I haven't already txt that I have tried making your bread recipe with my SDS" B4 & after this huge rise with million of every sized bubble!! Now is there anything I can do to make this " SDS" less active & more sour?!?! I have had asked everyone else & only seen your comment area last night!!Nnn
Thank you juud ⁶⁶⁶ TO
Hi Bryan, thank you for sharing your process. I learned so many takeaways from you as well. I am not 100% sure if I am a good resource for your question, we prefer non sour taste of sourdough. I think the starter cant be freshly fed, it can be active but not fed as often as you did. Also, you have to let the shaped bread sit for longer, thats when it develops more of the sour flavor. I think searching for some youtube videos with tips might be helpful for you. I hope the two tips are a good starting point. Let me know what else you learn. 🙂
Thank You Very Much for your feed back & I did tell U it is a or was a Question THAT just isn't anywhere online!!! & You happen to be the only person who has replied back to this Q😊 Your Assume Love!! xo "bb"
OK - Natalya - I am sorry!!! I did write down my entire Questions with as many detail I possibly could so #1 maybe U could desifer what I may have done wrong #2 also for you to know where (it would be in your mind & not my mind) (if I had the answers in my head - there really wouldn't be this here purpose of You right!! (As always I was maybe only 10 word from finnishing & sending the message when this cell slipped & my thumb hit something & everything i had txt was gone!!!!
(I hope this is - sorry I have to start the Q another way!!! I ha have a simple (on my mind) question in my mind that needs an answer ASAP!!! Cuz seemingly I am the only person who has asked this so - must do it anyways - I just hope its nothing bad!!! I have seen PPL (s) leave U more then 1 mess9& that is what I am - not asking - hoping it's nothing bad in the long run & it shouldn't be more then just 1 next message after in send this one OK!!! Will try fitting it all here but if I have to start a next one OK!!! Ty😊 OK in short & I haven't seen my problem anywhere in 4 days of searching!!! Had to freeze my "SDS" (SOUR DOUGH STARTER) 6 months back & have revived it better then I thought - to this was 5 days ago feeding it 3 times in 36 hour time frame & using a 4 liter container - 5 days it has gotten to the 2 liter mark - half container!!
I had no idea you can freeze SDS, I need to research this!
Can this recipe make a regular loaf
Hi Carolyn, If I am understanding your question correctly, you are able to shape this recipe in a loaf shape. I hope this is the answer you're looking for.
do you use starter direct from the refrigerator, or room temperature?
fed or discard?
Hello Mary, feed the starter 8 hours prior to using it and keep at room temperature so that the starter is ready for you when it's time to bake. If you put it in the fridge it’ll make it dormant; I only stick my sourdough starter in the fridge if I’m not planning to use it any time soon. Hope this helps!
Hi, could this be done without a Dutch oven?
Hey there Anastasia, You absolutely can! Good luck and Happy Holidays!
Any suggestions on how?
Sure, You can take a look at step 9 in the recipe. Good luck!
Hey there!! If I’m on a time crunch can the 8 hour rise time be shortened?
If you place your started in the over, under proof setting, it takes about half the time.
Hi there Heather, I have not tried to speed up the rising process. If you give it a try, I would love to know what worked for you. Good luck!
Have you tried any other recipes from the book you mentioned in the comments section? Thanks
Hi Jessica, I have but mostly the book was a great guide when I got started. It helped me with the process.
Hi, can the second rise be more than 8 hours on the counter? Or should I put it into the fridge instead?
Hi Vita- it's fine if its more than 8 hours for the second rise! What you can also do is: after 8 hours you shape it, and then refrigerate the shaped bread until you are ready to bake it if you are unable to bake it right away.. Hope this helps!
The recipe says 45 minutes at room temperature for the second rise or a couple hours in the fridge. How long could I have it in the fridge without overproofing it?
Hello Emily- You can keep the bread in your fridge overnight even! Say the dough already sat on your counter most of the day, you can then shape it and stick it in the fridge for a few hours or overnight and bake directly from the fridge the next morning. Enjoy!
This is the first time I've made edible bread of ANY kind! What an easy recipe with great instructions.
Hi Pamela - That's so awesome to hear! I'm glad you found the recipe to be accessible. We are so obsessed with sourdough.
Is their anyway to make all purpose like bread flour? Or do I specifically need to buy bread flour
Hi Anna- the type of flour really does make a difference in this particular recipe, so I would recommend using the bread flour for best results!
I thought it was hard to make a sourdough bread. I followed your recipe and it came out perfect from the first try.
Hi Nina- how exciting! Glad to hear your sourdough came out perfect. 🙂
After the 8 hours my dough was not wet and bubbly. Did I do something wrong?
Hi Emma- did it double in size?
Yes it doubled in size
Hi Emma- oh good! So if it doubled then you should be able to proceed with the recipe no problem. I hope it turns out beautifully!
I had the same problem. The top formed a skin. I followed the instructions and covered the dough with a towel. Was I supposed to cover with a plastic wrap instead?
Hi Katie, I recommend that you cover the dough with plastic in the recipe. Thank you for reaching out!