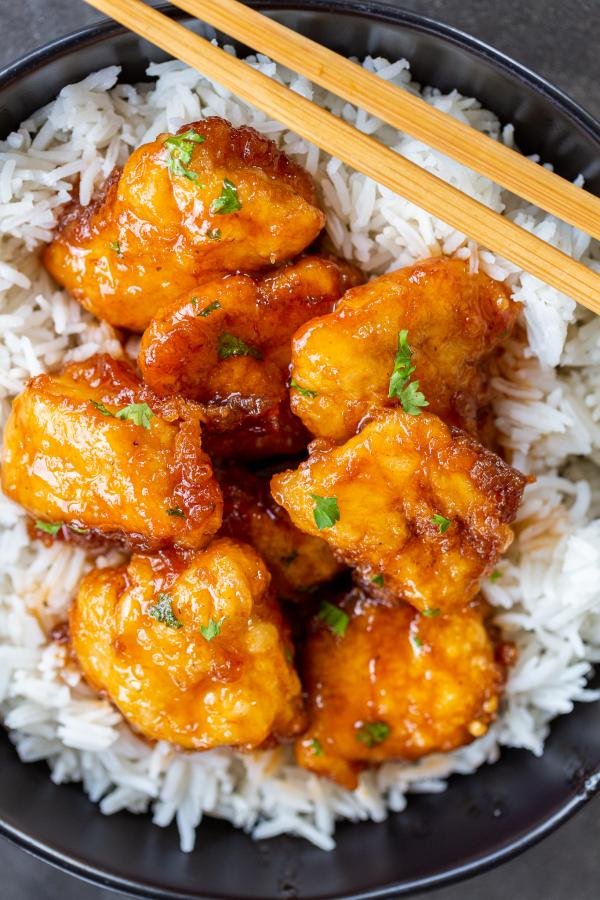
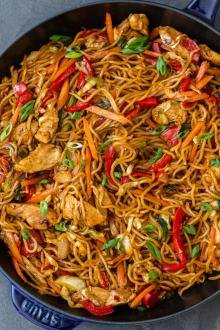
This sweet and sour chicken is made with a sticky and tangy sauce that’s simply irresistible. You’ll be coming back for seconds.
If you’re a huge fan of takeout, you’re in the right spot. In our early family days, we frequently ordered takeout. When my boys were super small, we were often tempted to order takeout to make dinner easy and fast. But — once I found out how easy it was to make sweet and sour chicken at home, I was hooked. It was simple enough and hassle-free that even with “two under two”, I didn’t get overwhelmed with this dinner.
Making Sweet and Sour Chicken
This dish comes together in three parts: frying the chicken, making the sauce, and baking. I promise — this sweet and sour chicken recipe is just as easy as takeout!
- Prep the chicken: Cut the chicken into uniform, bite-sized pieces.
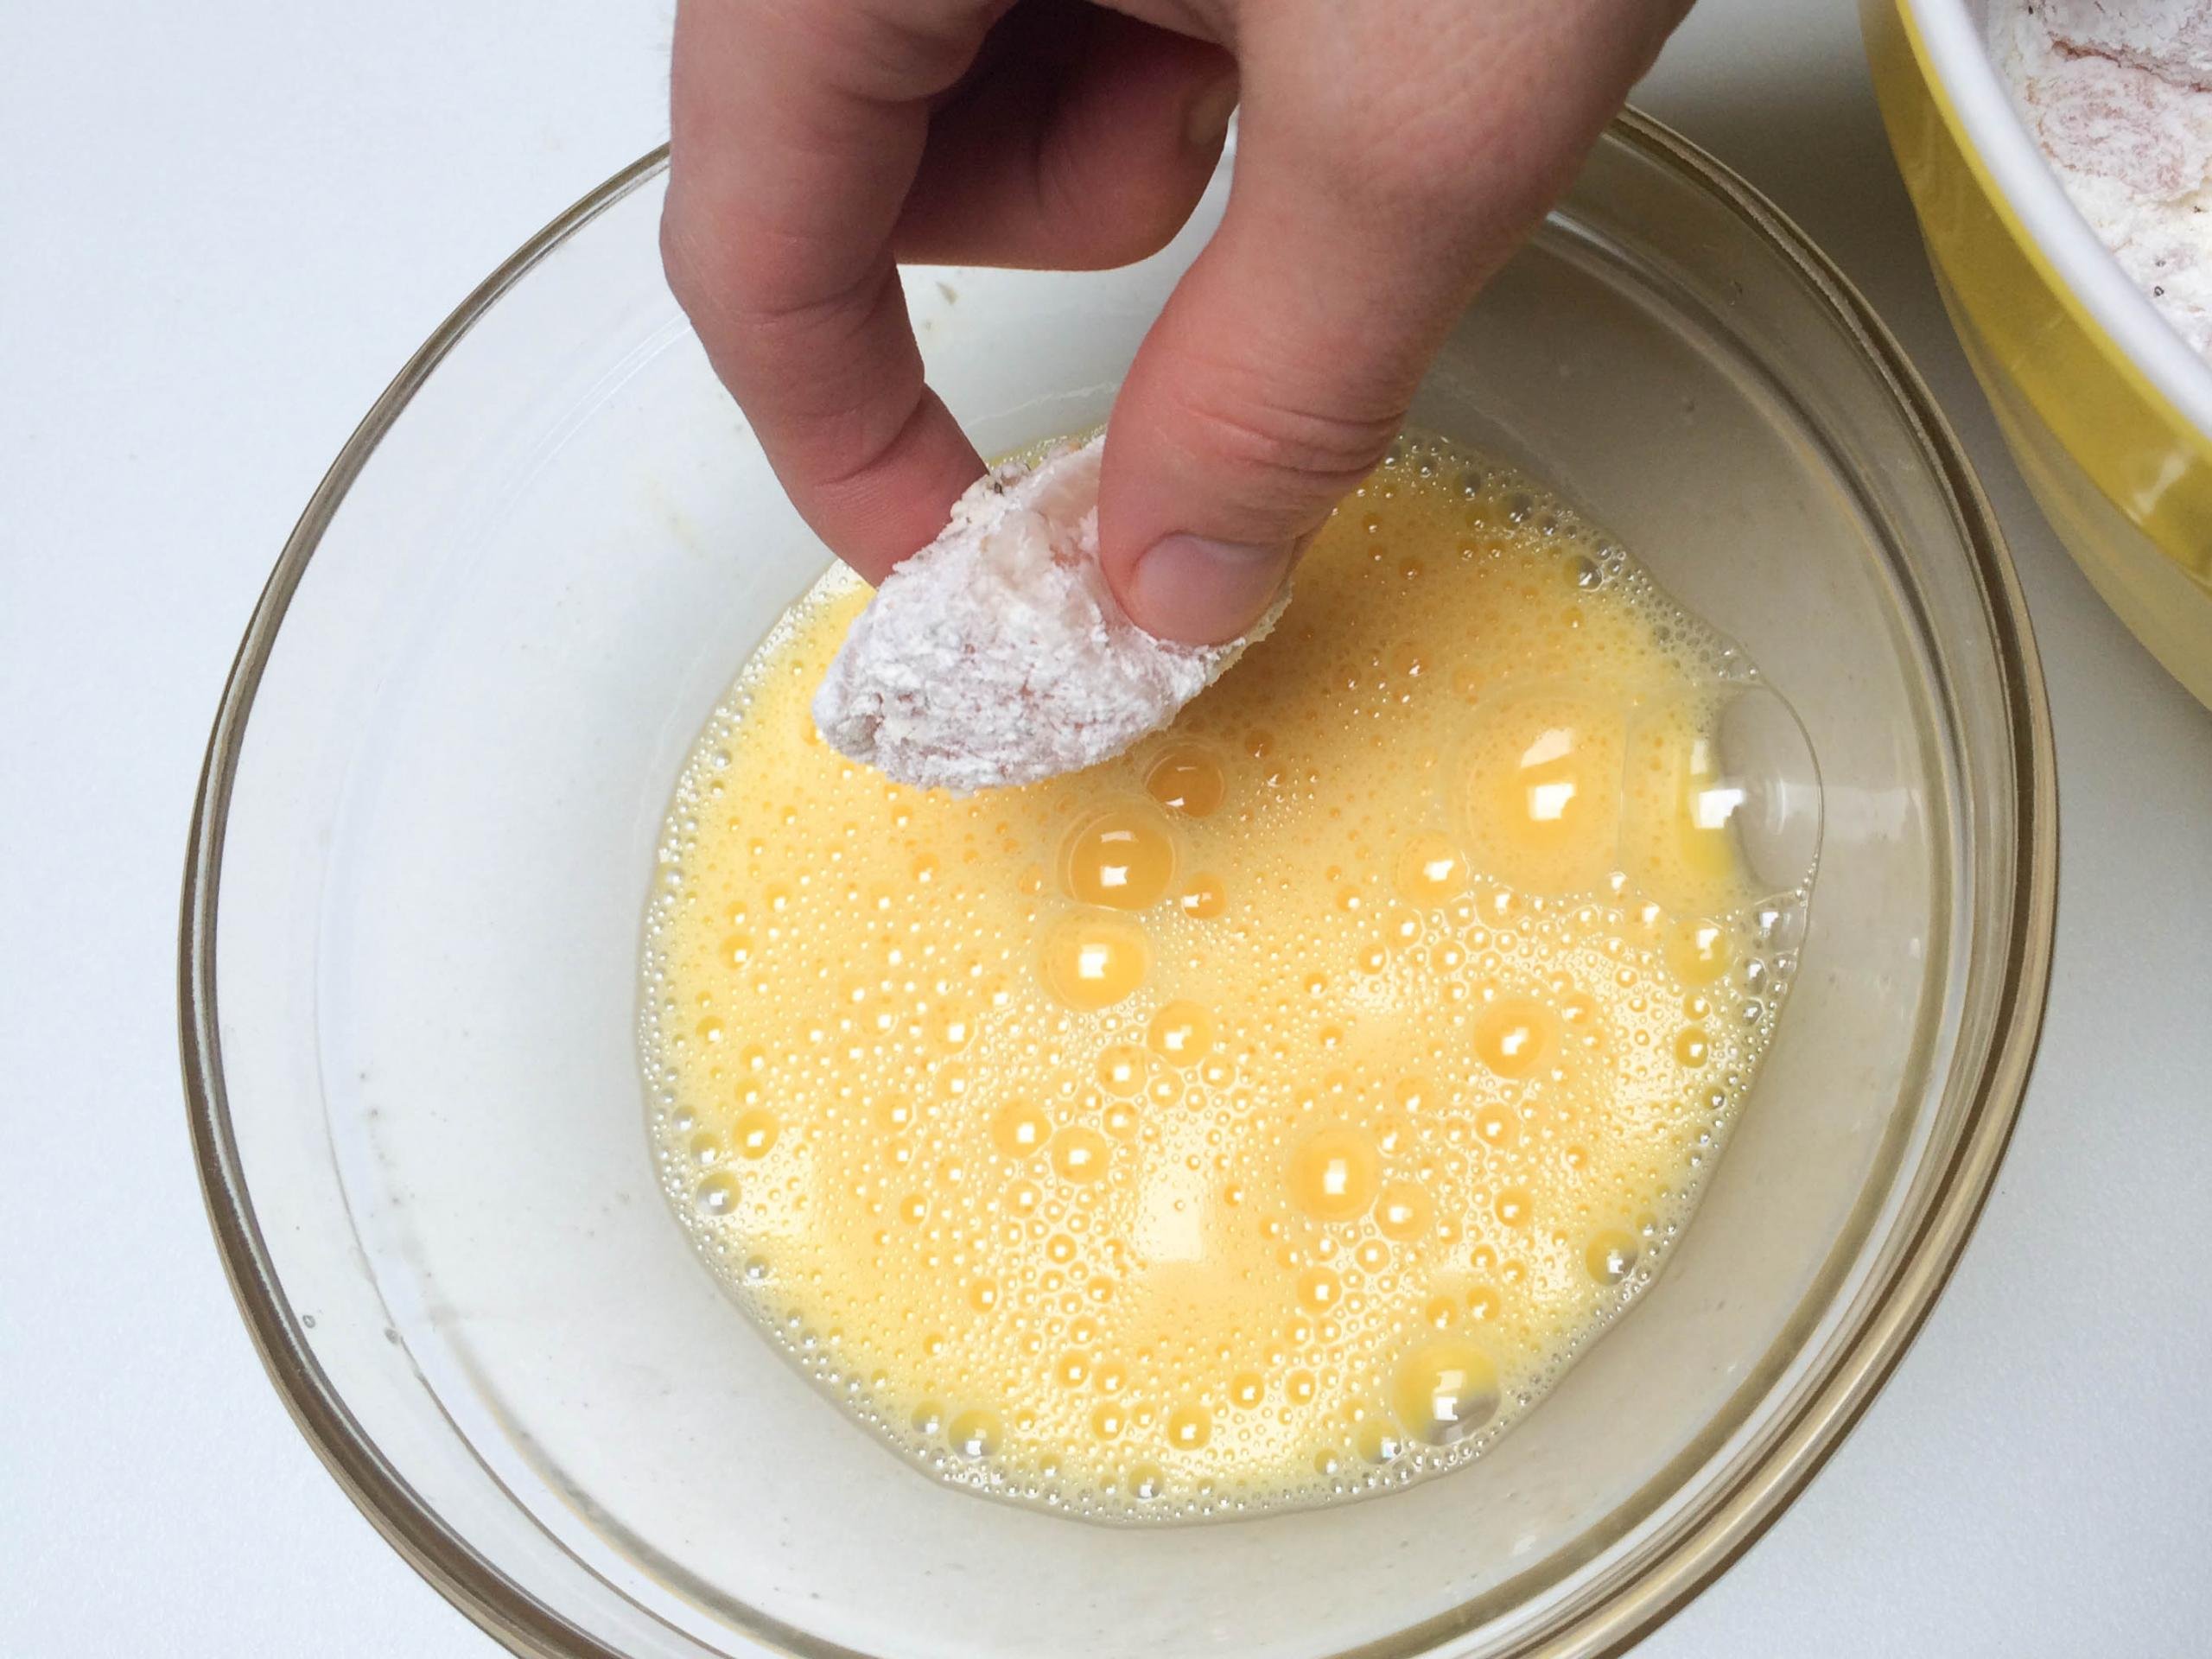
- Coat the chicken: Place the chicken pieces in a large bowl with cornstarch, black pepper, salt, and pressed garlic cloves. Toss to combine.
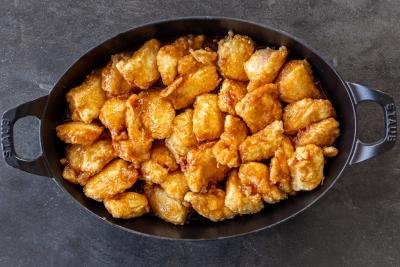
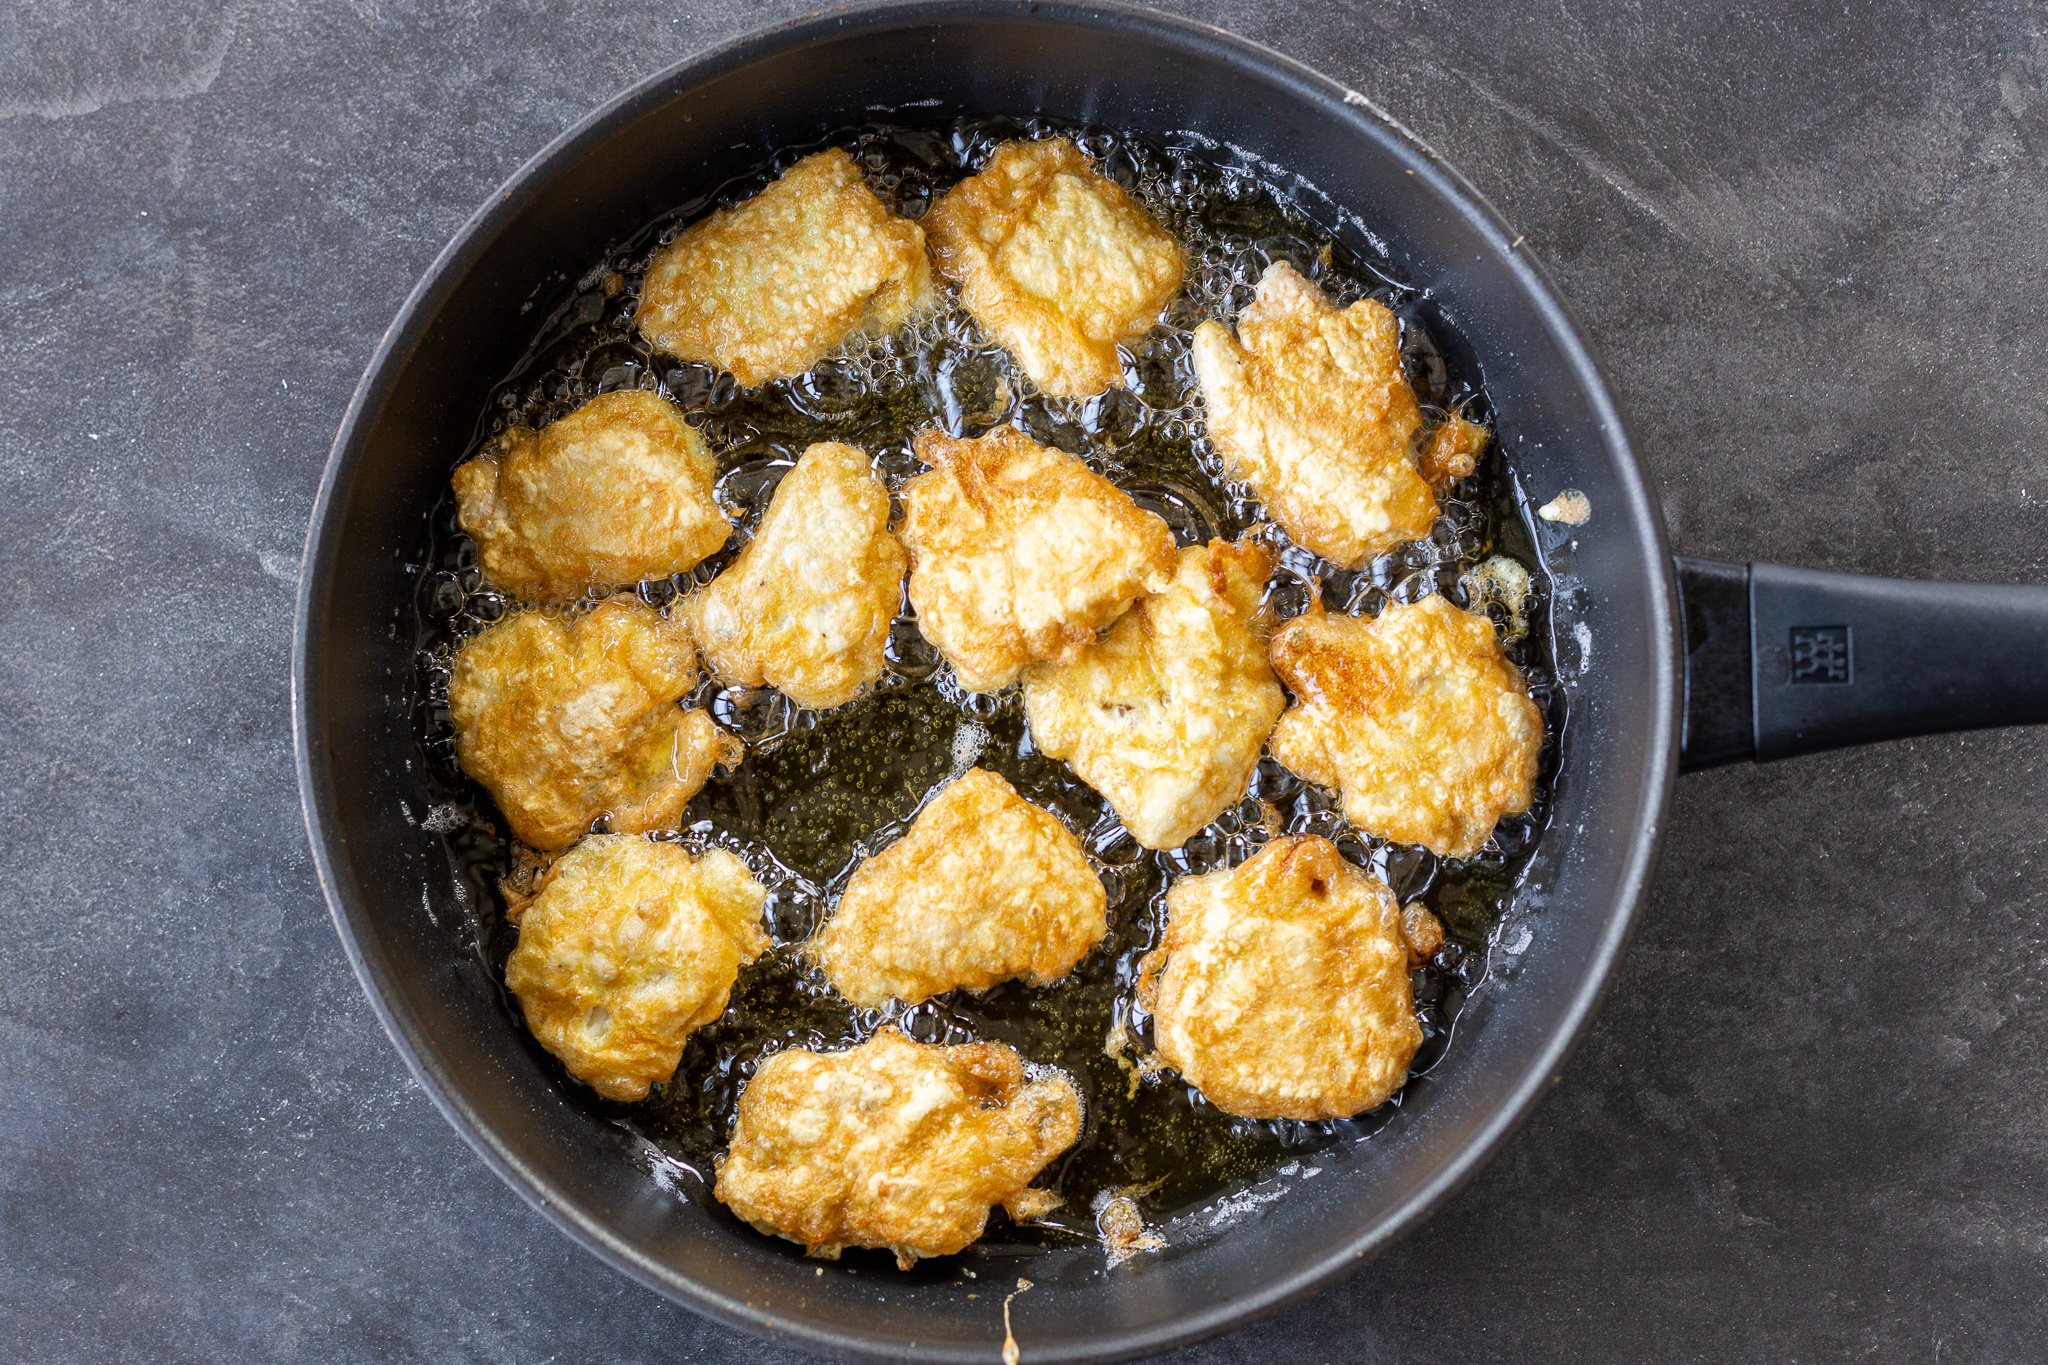
- Fry the chicken: Whisk a large egg in a shallow bowl and dip each battered piece of chicken into it. Then, transfer the chicken to a skillet preheated with oil and fry each side until golden brown. Place the chicken in a single layer in a baking dish.
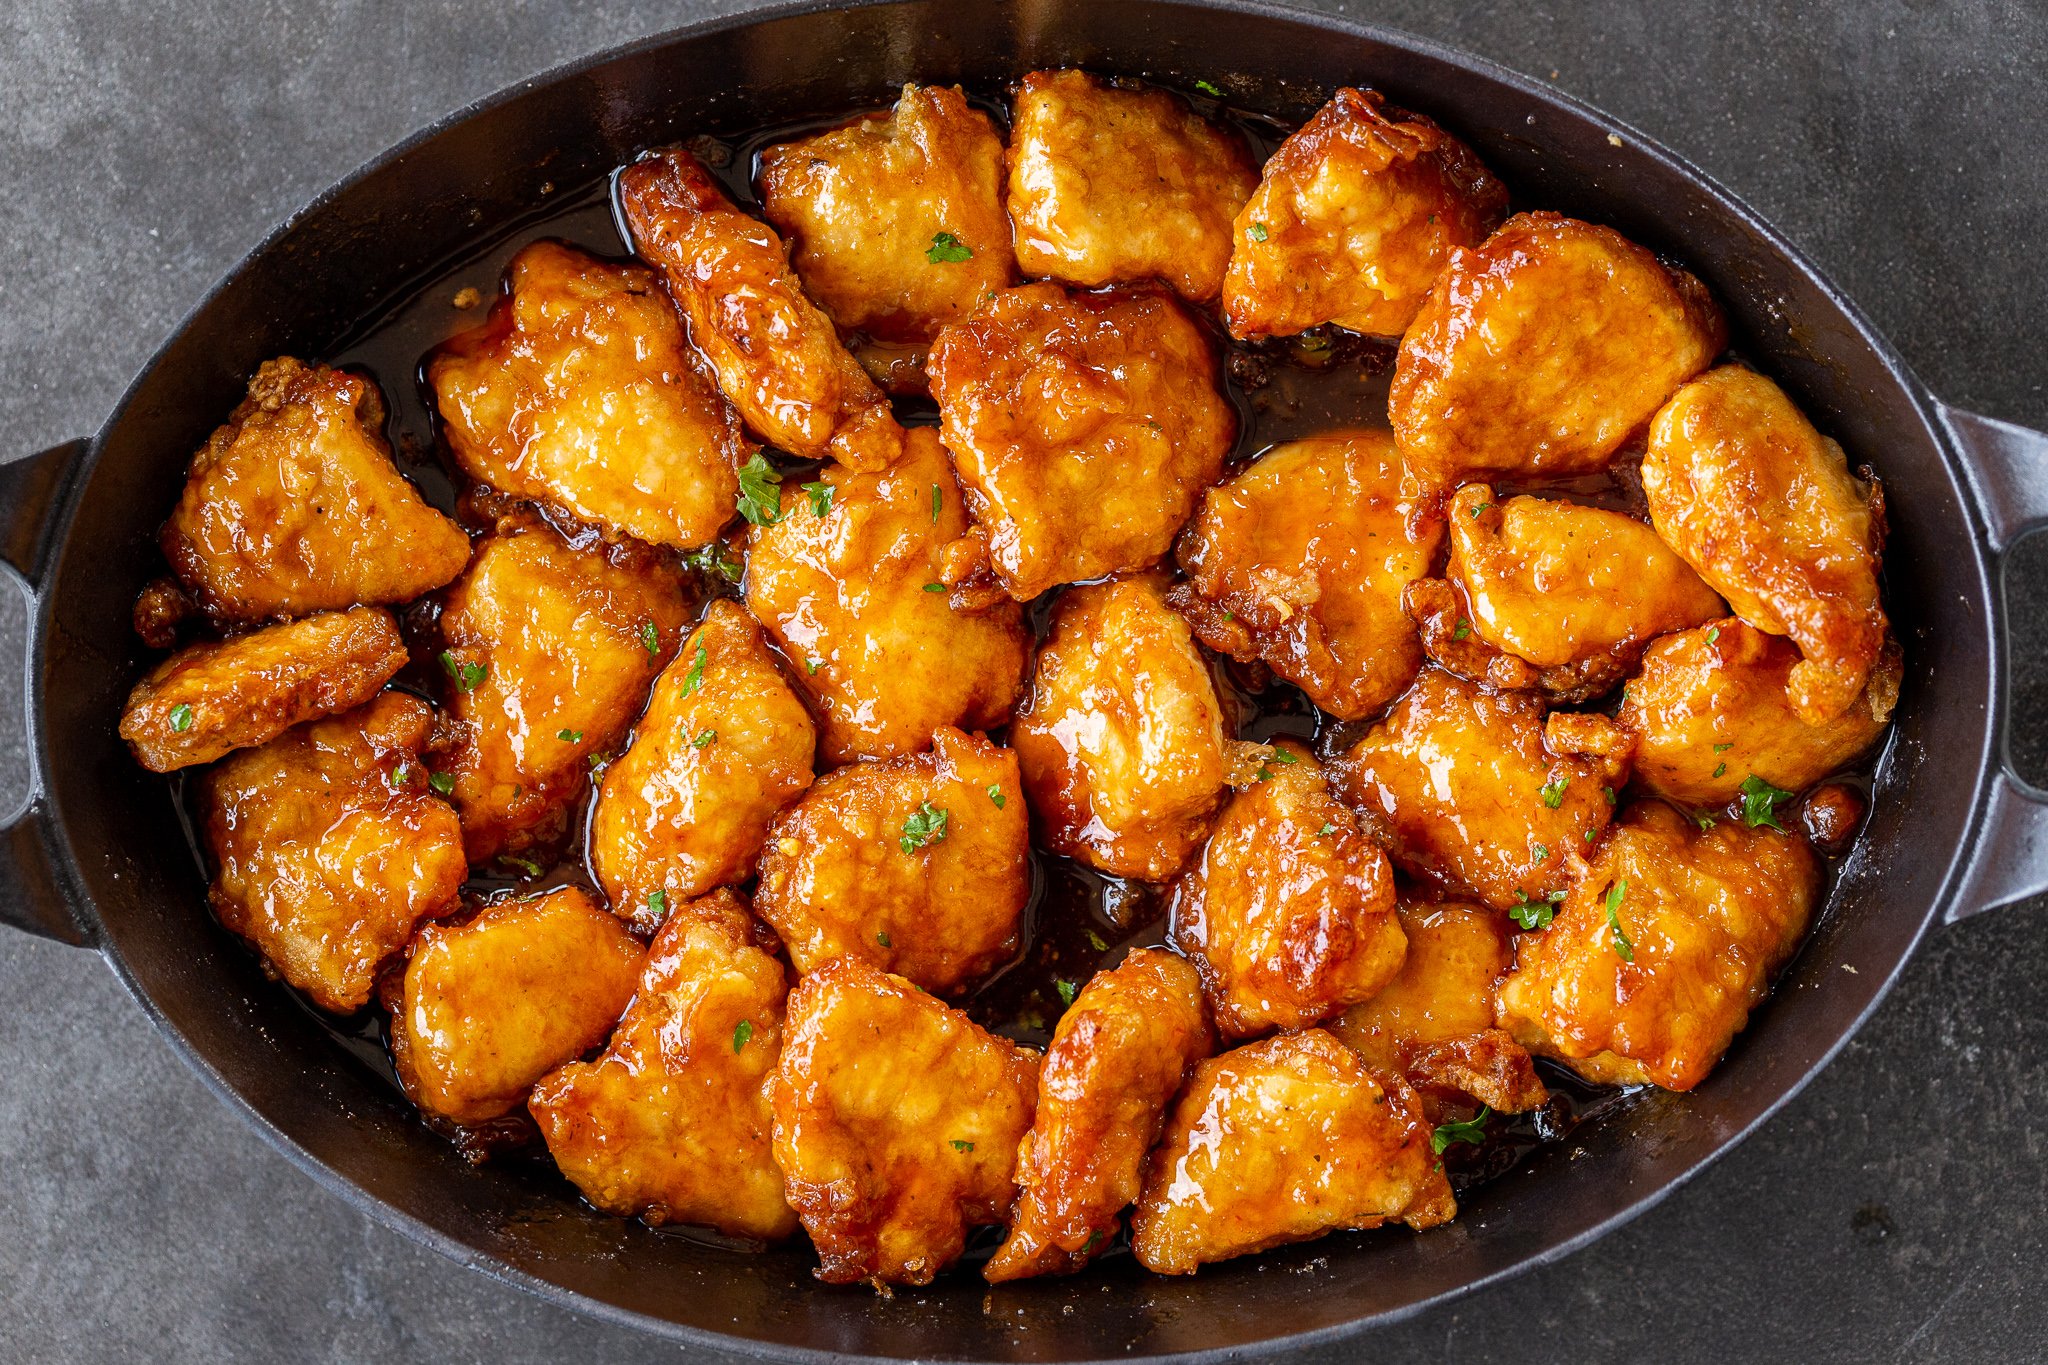
- Mix the sauce: In a small bowl, whisk together the sugar, soy sauce, ketchup, apple cider vinegar, then pour it over the chicken.
- Bake the chicken: Bake the chicken at 350°F for 30 minutes (flipping every 10 minutes). Enjoy!
Hot tip: Serve sweet and sour chicken over a bowl of steamed white rice and crispy wontons or with veggie lo mein, beef lo mein, or shrimp lo mein. If serving these as an appetizer, pierce each chicken with a toothpick for easy snacking.


Tips to Make the Best Sweet and Sour Chicken
After years of making this recipe, I’ve compiled a few tips and tricks that ensure I nail the chicken every single time.
- Swap with skinless chicken thighs: If you love dark meat or more juicy, tender meat, use chicken thighs instead of chicken breasts.
- Briefly fry the chicken in one layer: Avoid overcrowding the pan, so fry the chicken in batches. Also, there’s no need to cook the chicken all the way through. Fry it long enough to get a nice crisp on the breading — it will cook the rest of the way through in the oven.
- Taste test the sauce first: Before pouring the sauce over the chicken, taste it to see if you’re happy with it. Some of my readers like their sauce less vinegar-y, so if that’s you, start with less vinegar and add to taste. If you like fruity sweetness, mix some of the canned pineapple juice into the sauce mixture.
- Add red pepper flakes for heat: If you like it on the spicier side, add in as many shakes of red pepper flakes as you can handle.
- Use brown sugar for a deeper flavor: If you want a more full-bodied sweetness, swap the white sugar with brown sugar.
- Bake the chicken with vegetables/fruit (optional): For a well rounded meal, add broccoli, carrots, red peppers, tomatoes, and/or onions to the baking dish. If you like a fruity spin, add pineapple chunks.
Here’s a secret: I use cornstarch instead of flour because I find it creates a light, crackly crust that stays crispy much longer than a flour-based batter. It’s my secret weapon to make that satisfying sweet and sour chicken crunch.

Storing and Reheating Chicken
Whether you have some leftovers to store or you’d like to have a batch on hand in the freezer, check out these tips to do it right!
- Refrigerator: Keep sweet and sour chicken in the fridge for up to three days in an airtight container.
- Freezer: If you want to freeze the chicken, do so after breading and frying it. Lay the pan-fried chicken on a baking sheet lined with parchment paper and pop it into the freezer uncovered. Once frozen, transfer the chicken to a freezer-safe bag.
- Reheating: To reheat the chicken, place it back in the oven or pop it in an air fryer for 5-10 minutes at 375°F.
Hot tip: If you want to prep ahead, prepare or freeze the sauce for up to two months. When you’re ready, allow the sauce to thaw on the counter and bake the chicken as directed.
More Asian-Inspired Dishes
- Simple Yakisoba Noodles Recipe – Japanese stir-fried noodles
- The Best Beef Stir Fry Recipe – Classic beef stir fry with veggies
- Easy Korean Spicy Noodles – Stir fried sweet glass noodles
- Air Fryer Korean Chicken Thighs – Sweet and salty chicken thighs
Recipe

Ingredients
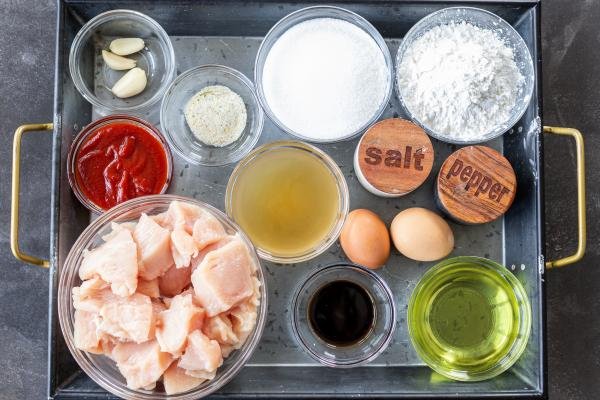
- 2 lbs chicken breast cut into bite sized pieces
- 1 cup corn starch
- 1/2 tsp black pepper
- 1/2 tbsp salt
- 3 garlic cloves pressed
- 1/2 cup oil for frying
- 2 eggs
- 1/2 cup sugar
- 1 tbsp soy sauce
- 1/3 cup ketchup
- 1/2 cup apple cider vinegar
- 1 tsp Garlic Parsley Salt
Instructions
- Place the sliced chicken in a large mixing bowl, followed by the cornstarch, pepper, salt, and pressed garlic cloves. Stir until the chicken is evenly coated.

- Preheat the oil in a large skillet over medium heat. Whisk the eggs in a bowl. Dip each chicken piece into the eggs.

- Fry the chicken on each side until it's golden brown. Place the fried chicken in a baking dish in a single layer.

- In a small bowl, whisk the sugar, soy sauce, ketchup, apple cider vinegar, and garlic salt together.

- Pour the sauce over the chicken and bake it at 350°F for 30 minutes.
- As the chicken bakes, flip it over every 10 minutes to create a nice coating. Enjoy over steamed white rice or alongside your favorite noodle dish!


This was absolutely amazing 🤩 thank you for this recipe.
Hi Elizabeth, That makes me so happy to hear 🤍 Thank you for trying the recipe and for the sweet feedback!
First time making this .. its easy to do and tastes terrific.. I added a tiny bowl or sweet n sour sauce on the side..wish I could show a pic..
Hey Deborah, I wish I could see the picture. If you have IG, you can send me a DM. Thank you for sharing this feedback, loved reading your review.
I am interested in trying this recipe and am wondering if rice wine vinegar can be substituted for the apple cider vinegar?
Hey, I haven't tried it with rice wine vinegar, but I think that can work. Rice wine vinegar has a milder, slightly sweeter flavor, so the taste may be a bit different. Let me know how it turns out if you try it!
Love this! I have used this recipe numerous times and each time it is a huge hit!
I followed the suggestion of another reviewer and put garlic powder in with the cornstarch and added the fresh garlic (chopped) to the sauce for fear of burning it when I was frying the chicken pieces.
I also followed Natalya's suggestion of using brown sugar in place of white for a deeper flavor (I highly recommend this!) as well as the addition of chopped onions, red peppers and pineapple to the dish with the chicken before baking.
I did not cut the vinegar as mentioned in several other comments.
Perhaps the intensity of the vinegar varies by brand as I am not a huge vinegar fan but found the amount in the recipe to be perfect.
Thank you so much for your thoughtful review and for sharing your tweaks! 😍 I love how you made this dish your own while keeping its core flavors intact. Also, you’re totally right about vinegar; it can vary a lot by brand, so it’s great that you found a balance that worked for you. So glad this recipe continues to be a hit for you!
Mmmm!!
Thank you :)))
I am looking for the sweet and sour chicken recipe but it hasn't,t appeared in my in box?
Hey Carmen, could you clarify what you're looking for? I’m not sure I fully understand.
I have never left a comment on recipes I’ve tried but I had to on this one! It was so good. My family loved it. I did double the sauce and I did add a red bell pepper and some onion. Definitely will be making this over and over again! Thank you!
Thank you so much for taking the time to leave such a lovely comment! I’m thrilled that you and your family enjoyed the recipe, and I love the additions of red bell pepper and onion—sounds delicious! I'm so glad to hear it’s a keeper in your kitchen.
Great recipe. Like others I cut the ACV to almost half. I added in a splash or two as needed. I suggest start on the lower side and add splashes as you taste it.
Great tip Tara - thanks for sharing! So glad you enjoyed the sweet and sour chicken! 🙂
Fantastic recipe! I doubled it for our big family and everyone loved it. I added the crushed garlic to the sauce instead of the cornstarch mixture, as I was afraid it would burn or fall off during the frying. (But
I did add some garlic powder to the cornstarch, too.) I cannot agree with the majority of commenters who believe it calls for too much vinegar... I thought it was PERFECT. With all the sugar and ketchup (more sugar), you need that vinegar to achieve the "sour" part of sweet and sour chicken... 🧐
Grateful for your feedback Hannah. So happy your family loved it! 🙂
What if you don’t have cornstarch
I used flour and it turned out pretty good 👍
Hi Margie, I don't know of any good replacements. I havent tried the recipe in any other way. If you figure out a way, can you share with us? Thank you!
I’m making it as I write this, used coconut flour it worked just as well!!
All I can say is WOW! This recipe “nails it”. The only change I made was to add some pineapple juice and tid bits to the sauce because I wanted that fruity taste but my whole family has already requested this as a repeat!
I'm happy to hear you and your family enjoyed the chicken! Pineapple juice is a nice touch - thanks for sharing!
Unfortunately I didn’t read the reviews. This had way too much vinegar. No one liked it. I was so disappointed.
Hi Michelle, I'm sorry this recipe didn't meet your expectations! I hope next recipe you'll love!
Made this tonight and it was delicious! After reading some reviews I dropped the account to 1/3 cup, otherwise I made it as written. My husband kept raving about how good the chicken was! I made fried rice to go with it. This recipe is a keeper!
Hi Jen, I'm so happy to hear you guys loved it! Thanks for sharing.
I have made this recipe once and am making it again tonight! It is delicious. For anyone who may like to know, I subed monk fruit sugar with the regular sugar and it was fantastic!
Hi Kristen, Thanks for sharing - that's useful to know! Enjoy!
I doubled the recipe and used skinless, bone-in chicken thighs. I added half a can of pineapple chunks and slices of sweet pepper. Even my young grandchildren lived it! Perfect balance of flavors in the sauce. I will definitely make this more often! Thank you!
Hi Roz, I'm happy to hear you found a recipe you loved and will make again. Thanks for the feedback!
Just made this for lunch, for the family. Everyone liked it. I added bell pepper and onion, and I finished this off in the wok for 3 minutes instead of putting it in the oven. Very good, but reduce the apple cider vinegar to 1/3 cup or it will be much too vinegary!
At what point did you add the peppers and onion?
Thank you
Hi Les- thank you for giving it a try! I'm glad your family enjoyed it. Regarding the acidity from the apple cider vinegar- thank you for the tip, and I appreciate the feedback!
This was so amazing!! My daughter is pretty picky and she asked for seconds! Thanks for the great meal!
Sarah, this is so great to hear. I love it when picky eaters love the meal. Thank you for sharing.
I have made this several times, sometimes adding pepper flakes my husband loves it! He is an extremely picky eater so thank you for a easy recipe he’ll eat.
Hi Tina, I am thrilled to hear that! Thank you for sharing your feedback, Enjoy!
It looks simple, fast and delish, will make it
Hey there! I hope you love it as much as we do! Let me know what you think! Enjoy!
Love it making it today for my third time .I’ve this recipe
Hi Debbie, I am thrilled to hear that! Thank you for sharing your feedback! Enjoy!
I made this tonight and used rice wine vinegar instead of apple cider vinegar (it was all I had). It was delicious. Everyone ate every bite. Next time I may double the sauce because I would like to cover the chicken more and have some for the rice. Thanks for sharing this recipe.
Hi there, I am thrilled that the recipe was a success and you were able to use what you had on hand! Enjoy!
I made this last night and it was absolutely delicious! Thank you for the recipe 🤗
Hi Kim, I am thrilled to hear that you love this recipe. Enjoy!
Natalya , do you think it will work on drumettes ? If I coat them and put them in the oven to bake for 30-40 mins .
Thank you 🙏🏽
Hi Kim, I think it may work, I have not tried that before so I would be very interested in the result. If you do give it a try, would you mind letting me know how it went?
This was good! Super easy to make. Taking the comments about ACV/acidity into consideration, I used 1/3 cup instead of 1/2 (Bragg organic brand). Turned out just right.
Hi Anna, thank you so much for taking the time to leave feedback. I am so glad the adjustment of ACV did the trick! Thank you for sharing. Enjoy!
I just made this tonight and it is delicious! I made chicken fried rice also.
Hi Tammy, I am so thrilled to hear that! Thank you so much for sharing. Enjoy!
I'm going to make this dish this week, but I'll add red and green pepper as well as onion to the dish and serve it with vegetable fried rice and a beef and broccoli dish.
Thanks for the great recipe.
Hi Len- that sounds like the most delicious meal! Enjoy it!
I made this and it was very good. My husband went back for seconds. I served it over a bed of Jasmine rice with sauted red bell pepper bits, fresh green onion from my garden and pineapple bits.
Next time I think I'll make more sweet and sour sauce to drizzle over the rice before serving. I will probably use a more sticky rice and add chicken broth to the rice water for a little more flavor.
Momsdish.com
Hey there Dayna, thank you so much for sharing your experience. I am so delighted to hear this recipe was a success! Enjoy!
Can't wait to make the sweet and sour chicken breast with vegetables and rice and put some pineapple in dish as well.Sounds beautiful the recipe.
You are going to love it, Heather! The added pineapple sounds so good! Good luck and Enjoy!
What would be a good alternative if you have egg allergy?
Hi Mafi, I would recommend either yogurt or buttermilk. It wont be the same exact results as with the eggs. But it will be close and still quite delicious.
I tried this with mixed vinegar. I added ACV with white vinegar and a little bit of water with extra all purpose soy sauce.
Hi Resty, How did it work out for you? I am curious. Thanks for the feedback!
I tried the recipe and it was very good. Was thinking of using a deep fryer instead of a fry pan. Have you tried that? What kind of oil should I use, vegetable, peanut?
Thank you, Yvonne. I haven't tried deep frying it, but generally either of those oils would work, as well as Canola. Enjoy!
I forgot to dip the chicken in the egg!!! 🙁 will it still come out good??
Hi Christina- I think it still will. Let us know though 🙂